前文:https://blog.joe1sn.top/2022/01/04/CVE-2021-3156/
受到youtuber:LiveOverflow的系列教程的启发,我发现在中文互联网上并没有相关的翻译教程,所以我想以实验报告的形式来创造这个从fuzz到exp的系列图文教程
原始视频合集:https://www.youtube.com/watch?v=uj1FTiczJSE&list=PLhixgUqwRTjy0gMuT4C3bmjeZjuNQyqdx
原始Blog:https://liveoverflow.com/why-pick-sudo-research-target-part-1/
原作者代码仓库:https://github.com/LiveOverflow/pwnedit
My previous blog: https://blog.joe1sn.top/2022/01/04/CVE-2021-3156/
I was inspired by the LiveOverflow’s Sudo Vulnerability Walkthrough on youtube, but i found there’s no Chinese version of this walkthrough tutorial, so i decided to write in experimental report way to create this “from fuzz to exploit” series.
Original Videos: https://www.youtube.com/watch?v=uj1FTiczJSE&list=PLhixgUqwRTjy0gMuT4C3bmjeZjuNQyqdx
Original Blog: https://liveoverflow.com/why-pick-sudo-research-target-part-1/
Source Project Code: https://github.com/LiveOverflow/pwnedit
本节内容:
Why Pick sudo as Research Target? | Ep. 01
How Fuzzing with AFL works! | Ep. 02
环境搭建
在最开始的复现博客中,我最初打算在docker中搭建整个项目,但是由于在docker上exp需要微调和学业压力导致我并不能花太多时间在上面,所以我直接使用的虚拟机。不过在原始的备份文档中我依然保存了当时搭建docker的记录,这里和原作者使用的方法类似.
Docker
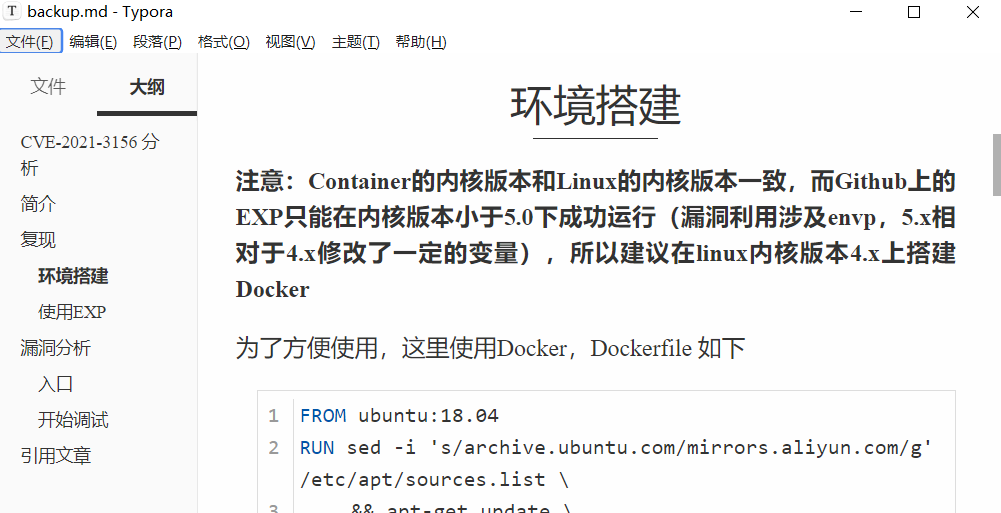
LiveOverflow在项目的git仓库中有了这个dockerfile文件。因为中国GFW,所以我换了下源,如果不需要可以删掉。我这里用的是windows的DesktopDocker搭建
ep1\Dockerfile
1 | FROM ubuntu:20.04 |
从 ubuntu20.04 的基础镜像中,设置编码为 ENV LC_CTYPE C.UTF-8,设置非交互式操作(ARG DEBIAN_FRONTEND=noninteractive),升级源并安装必要的编译运行环境,之后下载有漏洞的 sudoedit 源代码编译安装。
之后在该docker中安装 AFL(American Fuzzy Lop) 的模糊测试软件,添加普通用户 user,最后修改命令提示符的界面美化一下并设置工作目录
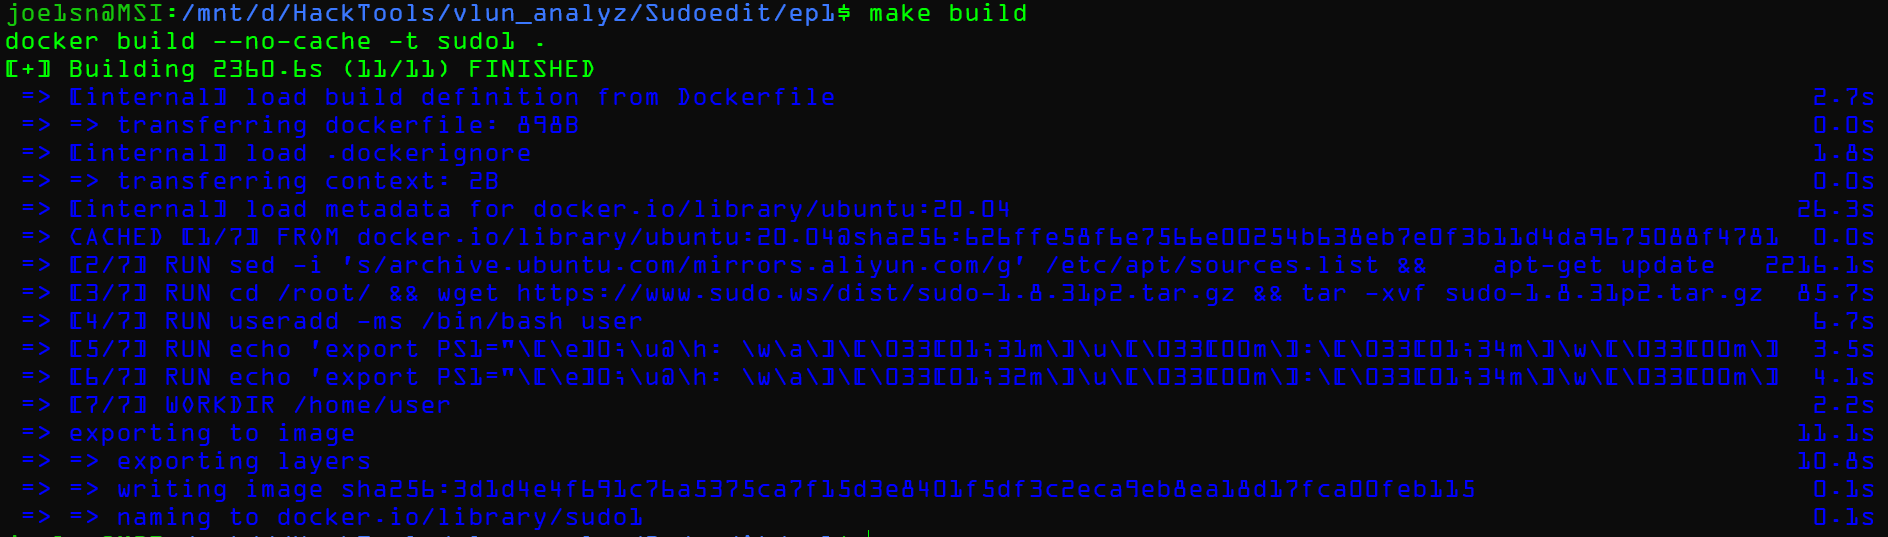
你可以使用docker build . -t sudo1来创建docker,但是同时作者编写了一个makefile来方便管理
1 | .PHONY : all stop build run attach root |
在make run的时候设置了-v $(CURDIR):/pwd参数可以让该目录下的文件同样位于在docker中的/pwd中,但是由于我使用的是DesktopDocker+VsCode(Docker plugin),对我来说不是很必要
所以可以make或者make build来创建docker

>>遇到的问题
-
ERROR [4/8] RUN cd /root/ && git clone https://github.com/google/AFL && cd AFL && make && make install
中国大陆网络屏蔽了github,导致其无法git仓库,可以挂代理,或者在docker创建好过后再利用
pwd文件夹放入afl -
docker搭建时间长
正常现象,更新下载的时间有点长,这取决于网速
创建容器make run
创建完成后使用make attach进入docker


AFL
项目链接:https://lcamtuf.coredump.cx/afl/
American fuzzy lop is a security-oriented fuzzer that employs a novel type of compile-time instrumentation and genetic algorithms to automatically discover clean, interesting test cases that trigger new internal states in the targeted binary. This substantially improves the functional coverage for the fuzzed code. The compact synthesized corpora produced by the tool are also useful for seeding other, more labor- or resource-intensive testing regimes down the road.
编译安装AFL
这里我是去掉git afl的,所以后来要装上
 问题:权限不够
- 以
docker exec -it -u root ContainerID /bin/bash进入,然后编译安装afl就行了
开始FUZZ
AFL编译sudo
AFL的测试是以白盒测试为基础的,我们要使用AFL的编译器对代码进行重新编译;虽然黑盒也行,但是要依靠插桩和qemu
进入sudo文件夹
1 | CC=afl-gcc ./configure --disable-shared |
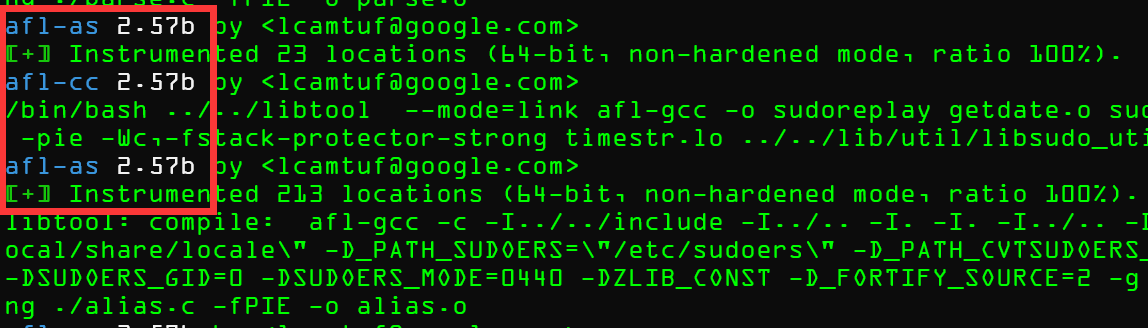 出现图中
出现图中afl-as之类的提示字符,说明正在使用afl编译
AFL进行分析与fuzz
AFL的分析方式有两种
-
输入为文件
1
afl-fuzz -i input_cases -o output_cases -- ./app.bin @@
@@就代表我们的输入示例
-
输入为
stdin输入流1
afl-fuzz -i input_cases -o output_cases -- ./app.bin
但是这里我们的是使用sudo参数处理的字符串
原作者通过搜索afl fuzz argv发现了在AFL的experimental实验性质文件夹中的argv-fuzz-inl.h头文件,具有以下描述

所以我们找到sudo main函数的文件,并且将argv-fuzz-inl.h复制到同一个文件夹下,然后在main函数附近添加AFL_INIT_ARGV()函数


AFL_INIT_ARGV()的原理
可以看原来的头文件:
1 |
afl_init_argv
1 | static char** afl_init_argv(int* argc) { |
本质上该函数就是一个宏定义,将原始的argv替换为afl_init_argv,从而能被后续的fuzzer所分析
afl_init_argv流程
- 输入流
in_buf开始读取 - 指针不为NULL和空格一直读取
- 出现空格或NULL置结尾为NULL,
- 若为空格,参数数目
rc+1
- 若为空格,参数数目
- 最后返回
ret,让ret代替了原来的argv,同时argc被改写为rc
重编译sudo
1 | CC=afl-gcc ./configure --disable-shared |
这里就直接略过afl的测试了,因为肯定会崩溃

AFL是如何工作的
这里开始是第二节的内容了。
我们的主要目标是fuzz出sudo存在的CVE-2021-3156漏洞,然后完成exp的编写,所以并不会细致的讲解fuzz的具体工作原理和过程。不过fuzz主要有以下几个过程:
-
预处理
- 分析和获取有用信息,使用PIN,符号执行,污点检查
- 黑盒白盒
-
输入构建
从数据 (种子)产生大量变异数据 。
-
输入选择
过滤无效数据,优化模糊测试
-
评估
大多数关于模糊的研究集中在两个指标上:覆盖率和利用漏洞的平均时间
关于上一节的报错
这里就体现了互联网的艺术:https://milek7.pl/howlongsudofuzz/,这篇文章遇到了相同的问题他的解决方案是:
将afl-gcc编译器替换为基于LLVM的afl-clang编译
For some reason afl-gcc instrumentation didn’t work, so I used LLVM-based one. We just need to override
CCfor./configure:
Clang是个啥?
了解过编译原理的人,或者编写恶意代码的人对这个一定很熟悉
The Clang project provides a language front-end and tooling infrastructure for languages in the C language family (C, C++, Objective C/C++, OpenCL, CUDA, and RenderScript) for the LLVM project. Both a GCC-compatible compiler driver (
clang) and an MSVC-compatible compiler driver (clang-cl.exe) are provided. You can get and build the source today.
编译器的结构

简单理解的话就是说Clang是gcc编译器的另外一个实现
同时AFL也支持使用afl-clang,和afl-gcc的用法相同
The clang wrappers (afl-clang and afl-clang++) can be used in the same way; clang users may also opt to leverage a higher-performance instrumentation mode, as described in llvm_mode/README.llvm.
这就涉及到afl-clang-fast的安装了
解决上一节的报错
安装afl-clang和afl-clang++
-
安装clang和llvm(dockerfile中已经提前装好了)
1
sudo apt-get install llvm clang
-
进入编译安装afl-clang和afl-clang++
1
2
3
4cd llvm_mode
make
cd ..
make install
重编译sudo
1 | CC=afl-clang-fast ./configure --disable-shared && make -j8 |

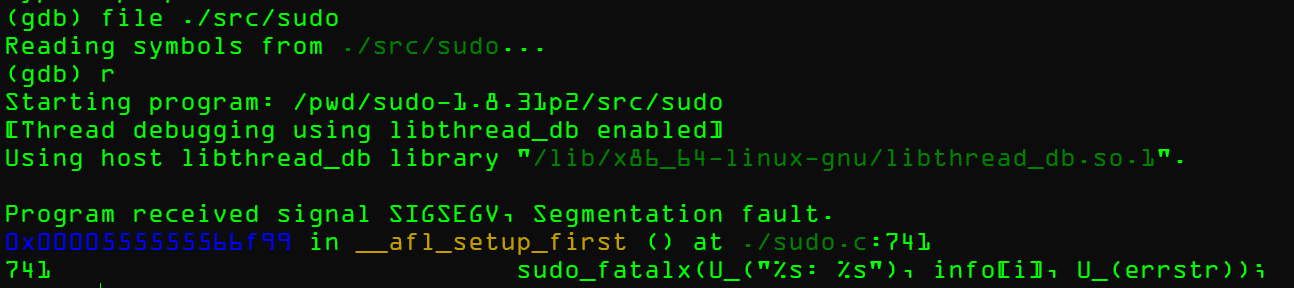
这里我发现其实在user用户下也会Segmentation fault,这个是因为权限的问题,后面就大致能感受出来了
开始Fuzz
创建输入输出
1 | mkdir ../input ../output |
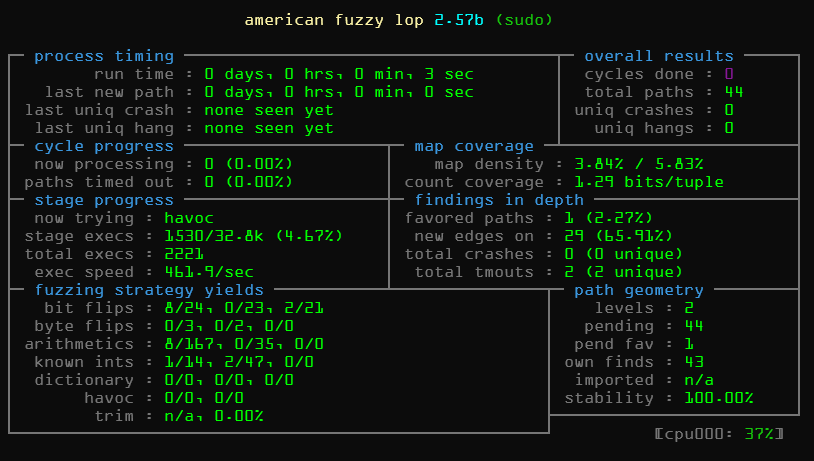
AFL的说明
AFL是以基于覆盖率测试的模糊测试工具,将编译过的数据送到被测试的程序中。被测试的程序中有使用AFL编译器编译时的插桩代码(__afl_maybe_log),可以让编译器返回那些函数被执行过(被覆盖到)
例如在windows的模糊测试中,可以使用DynamoRIO对文件进行覆盖率测试
1 | D:\HackTools\Fuzz\winafl\build_x64\bin\Release>D:\HackTools\Fuzz\DynamoRIO-Windows-8.0.0-1\bin64\drrun.exe -t drcov -- test.exe not_kitty.bmp |
然后再IDA中加载覆盖率文件
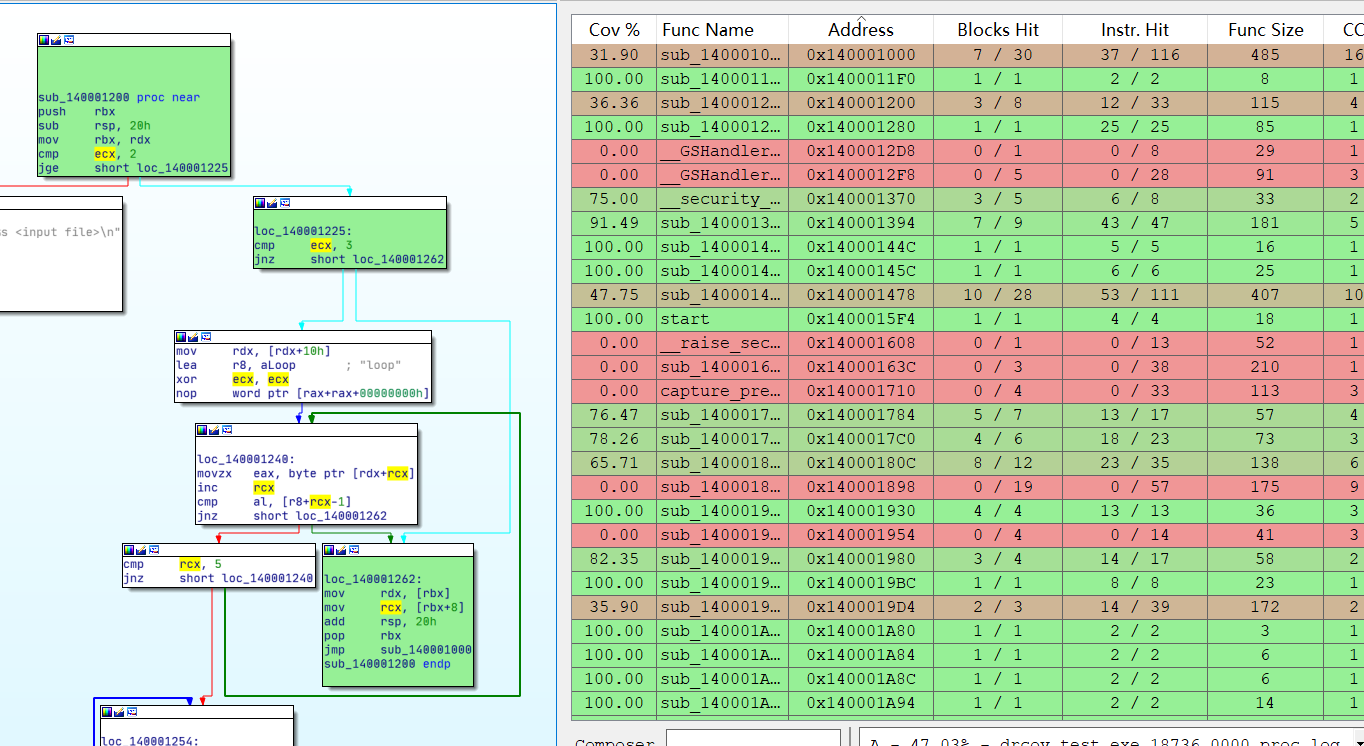
其中绿色的就是单次执行被覆盖到的代码,被覆盖到的代码越多,测试也就越准确。
所以AFL可以通过插桩代码,不断改进输入的数据,从而得到更高的覆盖率
会得到漏洞吗?
不会的,在前文中已经写过了
sudoedit就是一个链接到sudo的文件
但是我们是尝试独立挖掘出这个漏洞,并且 sudoedit 是作为独立插件编译得,所以我们并不能直接的测试sudoedit -s
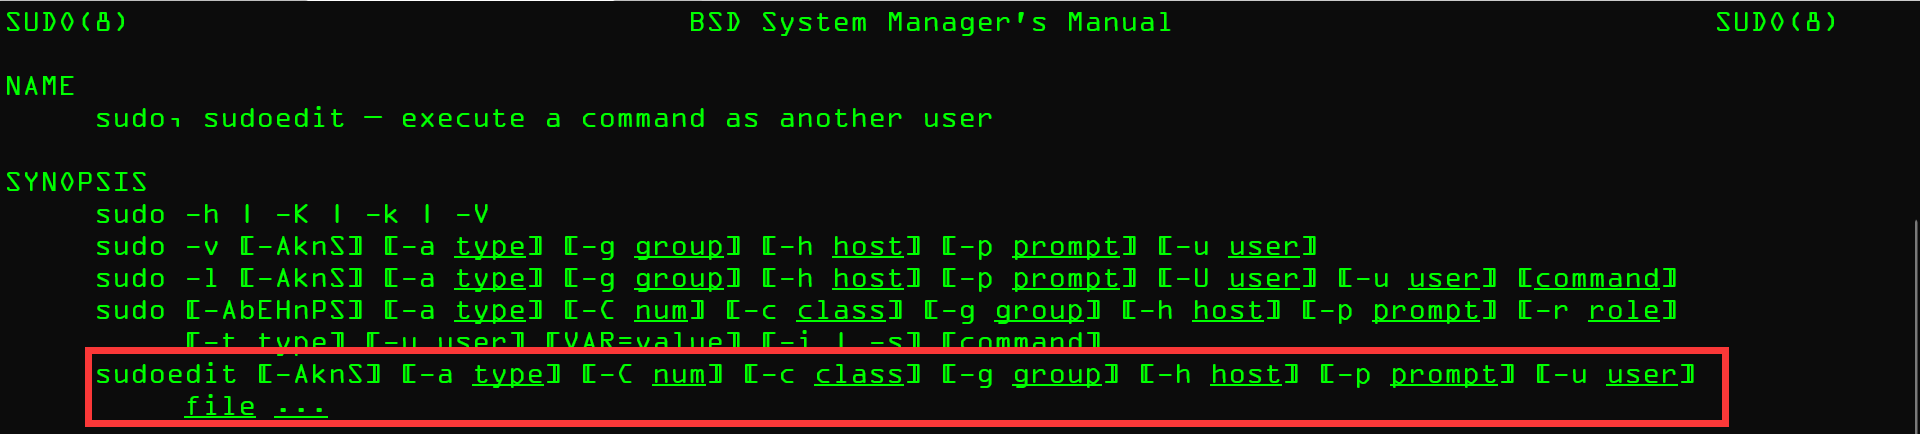
在测试前了解你要测试的程序
1 | man sudo |

>>问题
-
This system has been minimized by removing packages and content that are not required on a system that users do not log into.To restore this content, including manpages, you can run the ‘unminimize’ command. You will still need to ensure the ‘man-db’ package is installed.
解决方法和造成原因在这儿:https://github.com/docker/for-linux/issues/639#issuecomment-478765756
直接输入
unminimize,这会花很长的时间,真的很长
新的思路
细心一点可能会发现在之前的
1 | static char** afl_init_argv(int* argc) { |
其中rc=1,说明是从argv[1]开始创建fake_argv的,但是我们知道argv[0]就是程序自身,那么我们就可以通过fuzz argv[0]从而找到sudoedit。那么修改试试看,重新编译sudo

>>问题
-
为什么没有变化
改的是同级目录下的
argv-fuzz-inl.h文件
**为什么都一样?**问题的解决同样在这里:https://milek7.pl/howlongsudofuzz/
Quick test shows that sudo/sudoedit selection doesn’t work correctly from testcases passed in stdin, because for some reason it uses
__progname.
sudo/sudoedit不会直接使用argv[0]作为程序名称,而是使用__progname
阅读sudo源代码我们发现

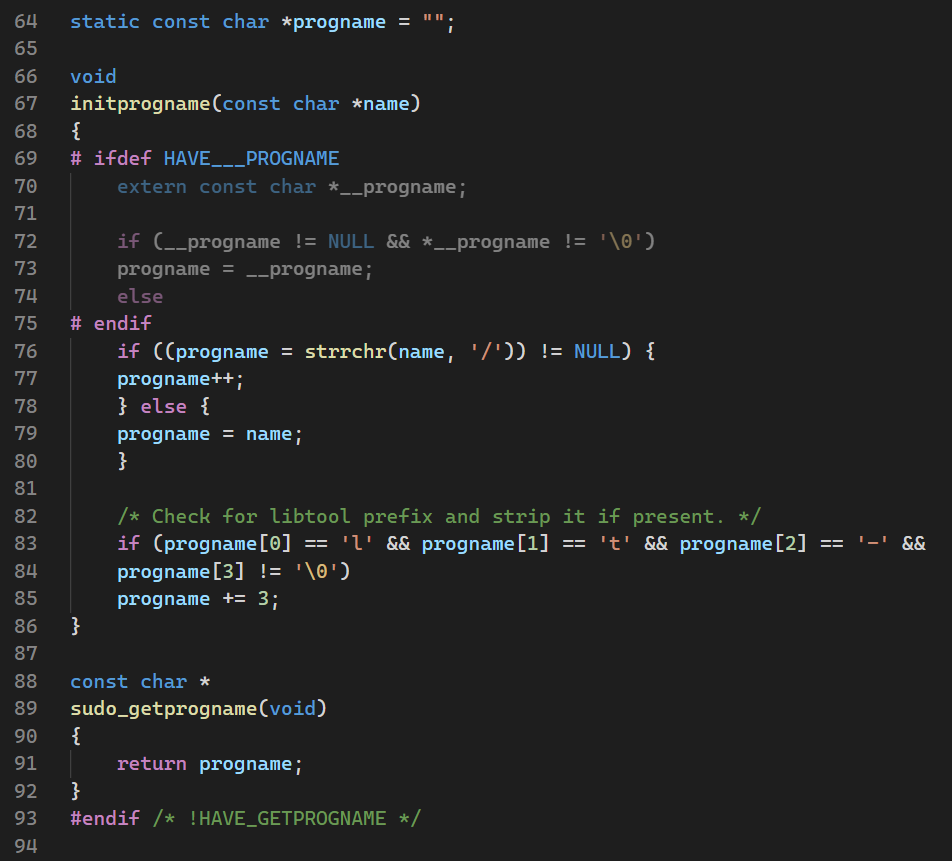
-
在
main中参数数目>0,传递
argv[0],否则使用sudo作为参数 -
在
ep1\sudo-1.8.31p2\lib\util\progname.c: init_progname中定义了
HAVE___PROGNAME,那么在编译时如果__progname不存在,才会用argv[0]做成程序名(因为vscode认为是windwos环境,所以这里是灰色的)
-
解决:直接删掉后重新编译

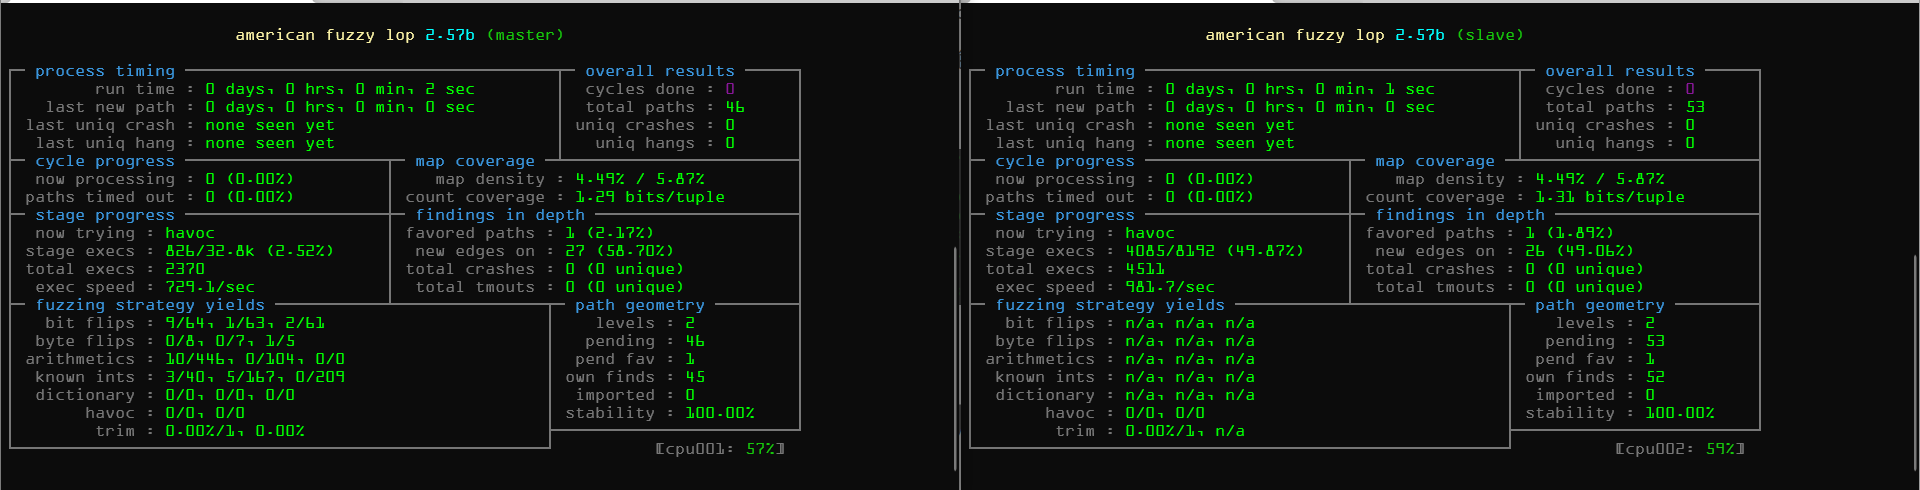
开始多核fuzz
-
-M选定主fuzz的单元(Master)
1
afl-fuzz -M master -i /tmp/in -o /tmp/out/ -- ./src/sudo
-
-S
选定为从属fuzz单元(Slave)
1
afl-fuzz -S slave -i /tmp/in -o /tmp/out/ -- ./src/sudo