【漏洞挖掘】win-afl使用指北-初级篇
在21年的时候曾经小小的使用了一点WinAFL,现在再回过头来做笔记
这里主要讲述WinAFL+DynamoRIO的Fuzz方法
简介
知道创宇这篇文章讲的已经很好了:https://paper.seebug.org/323/
由于闭源特点,那么需要使用DynamoRIO进行插桩,检测指令块的转移
WinAFL主要特点就是将AFL中的函数使用WinAPI进行重写,然后调用DynamoRIO的API完成fuzz
编译
主要是参考了https://bbs.kanxue.com/thread-261323.htm和官方过程:https://dynamorio.org/page_building.html
DynamoRIO
32位
1. 编译
软件下载一把梭
git clone https://github.com/DynamoRIO/dynamorio.git |
这里我使用的是x86 Native Tools Command Prompt命令行
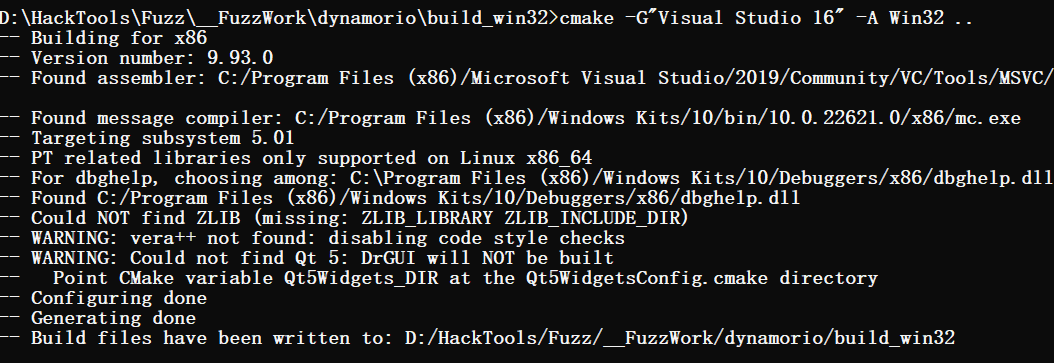
cmake -G"Visual Studio 16" -A Win32 .. |
如果发现缺少什么的话,使用set Name=Value再编译,最后
cmake --build . --config RelWithDebInfo |
2. 测试
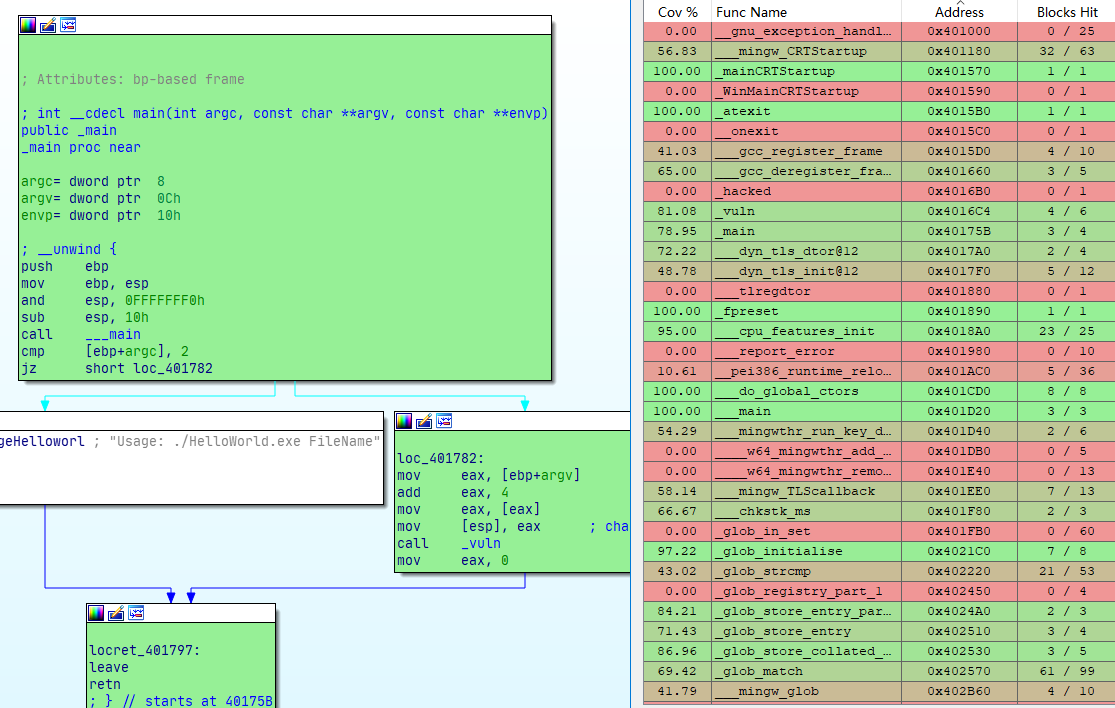
"D:\HackTools\Fuzz\__FuzzWork\dynamorio\build_win32\bin32\drrun.exe" -t drcov -- "D:\HackTools\Fuzz\WinAFLFuzz\testcase\32\HelloWorld.exe" "D:\HackTools\Fuzz\WinAFLFuzz\testcase\32\password.txt" |
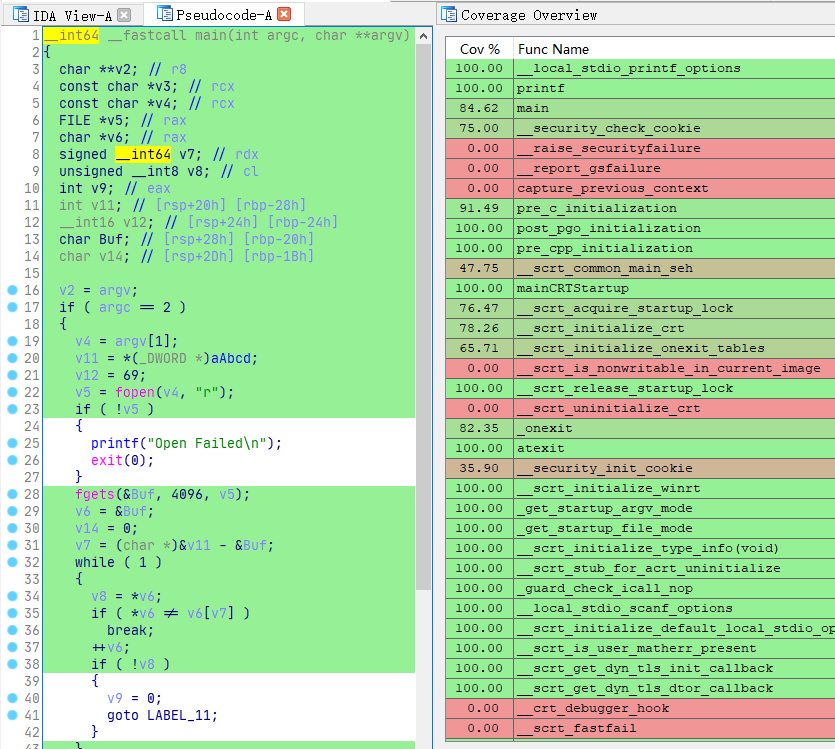
这里我换成了老版本 dynamorio-cronbuild-8.0.18684,因为新版本是3.0版本的覆盖率文件,IDA Lighthouse只支持2.0,不过你可以通过https://gist.github.com/wumb0/de671cc5051353fd32af4aecc811a282进行版本的转换。
64位
1. 编译
按照官方的步骤
%comspec% /k "C:\Program Files (x86)\Microsoft Visual Studio\2019\Enterprise\VC\Auxiliary\Build\vcvarsamd64_x86.bat" |
或者启动
Developer Command Prompt for VS 2019 |
然后进行cmake配置
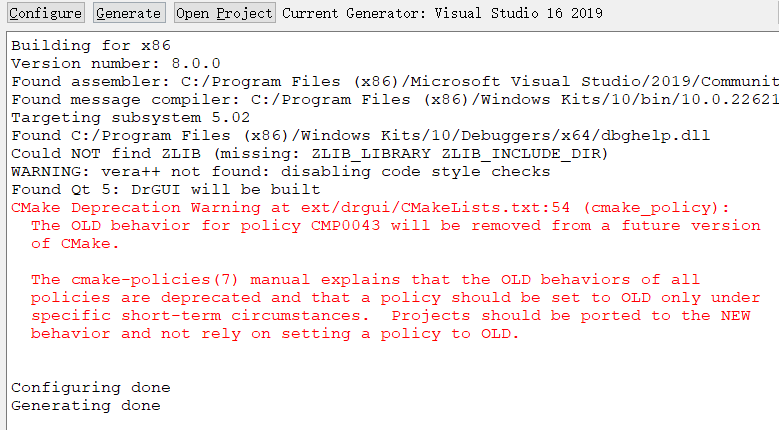
cmake -A x64 .. |

就可以参考看雪那篇文章修改下报错
利用cmake-gui修改完过后就可以继续回到cmd进行编译了(也可以用vs2019)
2. 测试
WinAFL
起手式
git clone https://github.com/googleprojectzero/winafl.git |
-
编译32位
cmake -G"Visual Studio 16 2019" .. -A Win32 -DDynamoRIO_DIR=D:\HackTools\Fuzz\__FuzzWork\dynamorio\build_Win32\cmake -DINTELPT=1 -DUSE_COLOR=1
cmake --build . --config Release
如果显示
drgui不完整,返回去在生成就行了,看雪上的教程是没有问题的 -
编译64位
cmake -G"Visual Studio 16 2019" -A x64 .. -DDynamoRIO_DIR="D:\HackTools\Fuzz\__FuzzWork\dynamorio\build_x64\cmake" -DINTELPT=1 -DUSE_COLOR=1
cmake --build . --config Release
测试
32位
-
首先进行插桩
@echo off
:: 接受用户输入
set /p target_module=traget excutable :
set /p target_offset=traget offset :
set /p sample=pins sample:

:: 输出用户输入的内容
echo target_module, %target_module%!
echo target_offset, %target_offset%!
echo sample, %sample%!


D:\HackTools\Fuzz\__FuzzWork\dynamorio\build_Win32\bin32\drrun.exe ^
-c D:\HackTools\Fuzz\__FuzzWork\winafl\build_Win32\bin\Release\winafl.dll -debug ^
-target_module %target_module% ^
-target_offset %target_offset% ^
-fuzz_iterations 10 -nargs 2 -- ^
%target_module% %sample%
D:\HackTools\Fuzz\__FuzzWork\dynamorio\build_Win32\bin32\drrun.exe ^
-c D:\HackTools\Fuzz\__FuzzWork\winafl\build_Win32\bin\Release\winafl.dll -debug ^
-target_module test.exe ^
-target_offset 0x1210 ^
-fuzz_iterations 10 -nargs 2 -- ^
test.exe .\in\password.txt查看生成的log文件,如果有
Everything appears to be running normally.那么就是完成了 -
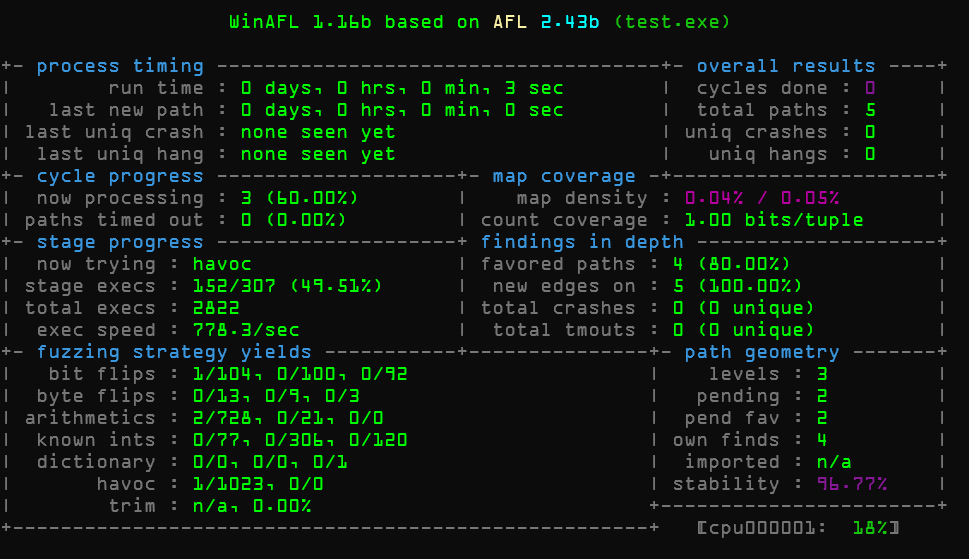
开始fuzz
afl-fuzz.exe ^
-i .\in ^
-o "D:\HackTools\Fuzz\WinAFLFuzz\out" ^
-D "D:\HackTools\Fuzz\__FuzzWork\dynamorio\build_Win32\bin32" ^
-I 100000+ -t 90000+ -- ^
-coverage_module test.exe ^
-target_module test.exe ^
-target_offset 0x1210 ^
-fuzz_iterations 5000 -nargs 1 -- ^
test.exe @@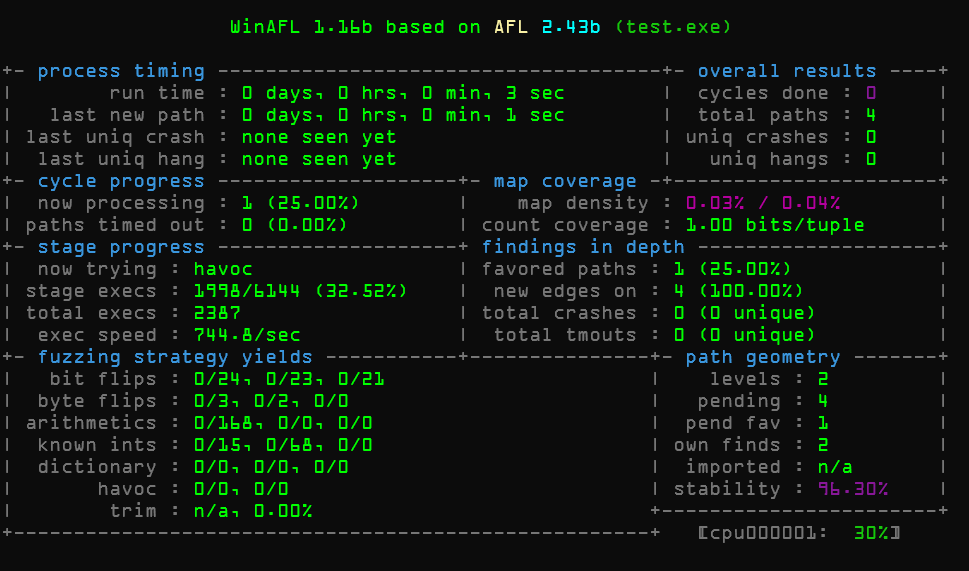
64位
过程也差不多
先插桩
traget excutable : test.exe |
然后fuzz
afl-fuzz.exe ^ |
测试2 - SimpleHunt
在之前我的博客写了windows下栈溢出的过程,这里我改写了下
|
gcc HelloWorld.c -o HelloWorld |
没有任何保护,这里以32位举例
fuzz
由于代码比较简单,不需要先生成覆盖率文件找到关键函数,所以首先还是插桩
D:\HackTools\Fuzz\__FuzzWork\dynamorio\build_Win32\bin32\drrun.exe ^ |
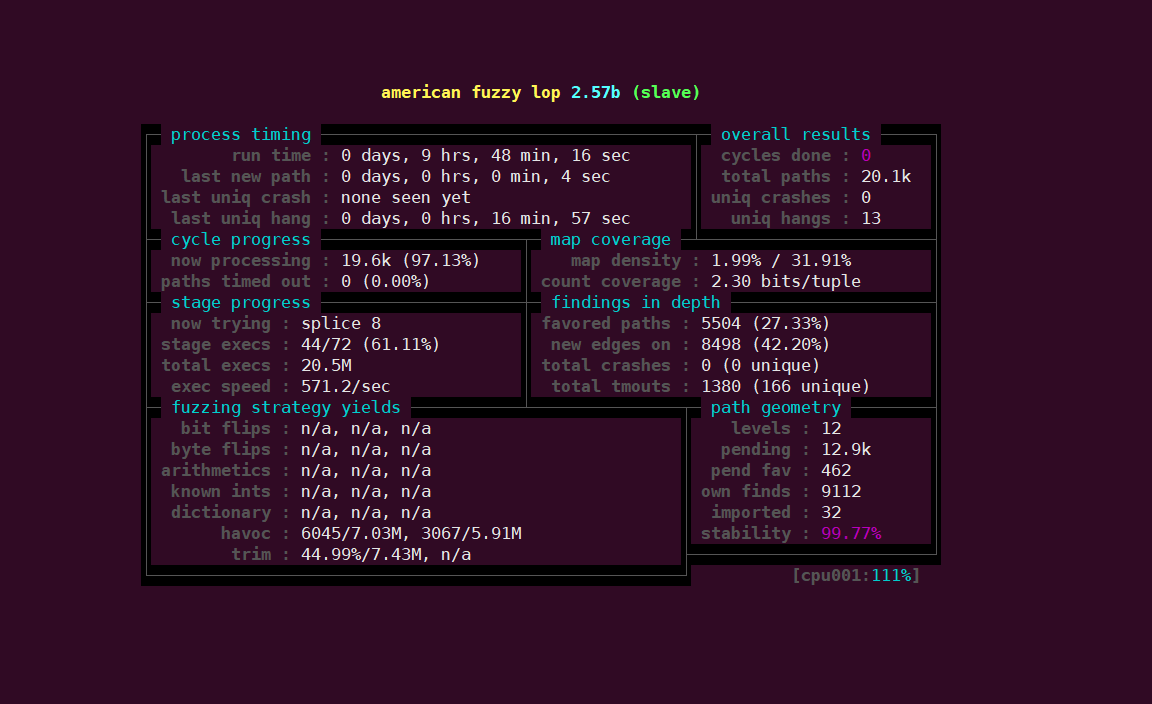
开始fuzz
afl-fuzz.exe ^ |
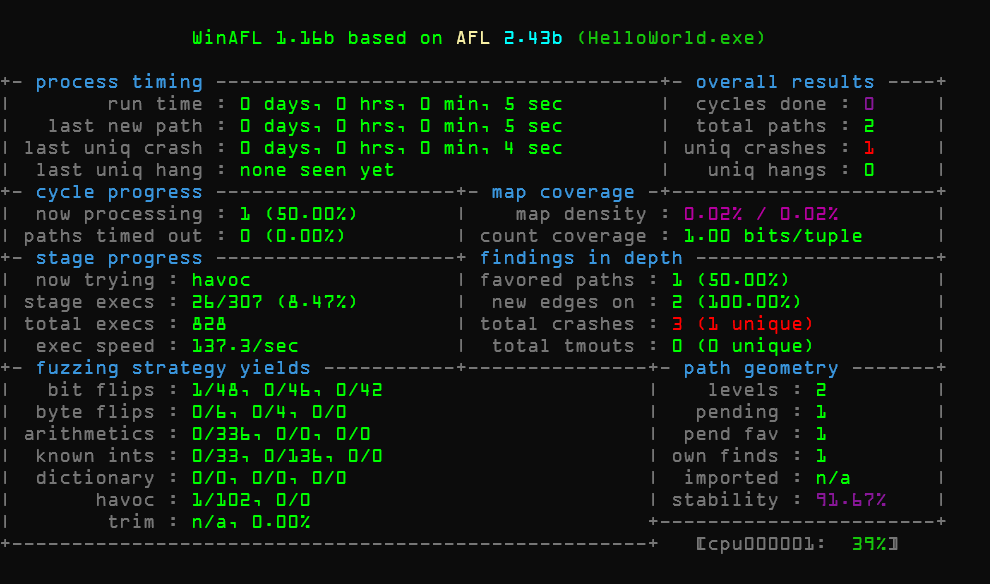
瞬间找到一个crash
PoC
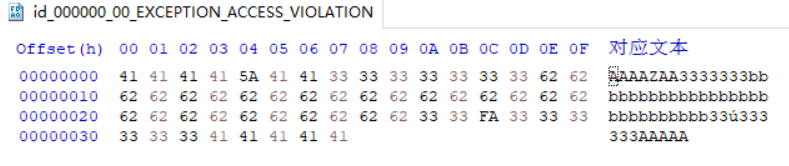
使用x32dbg进行调试
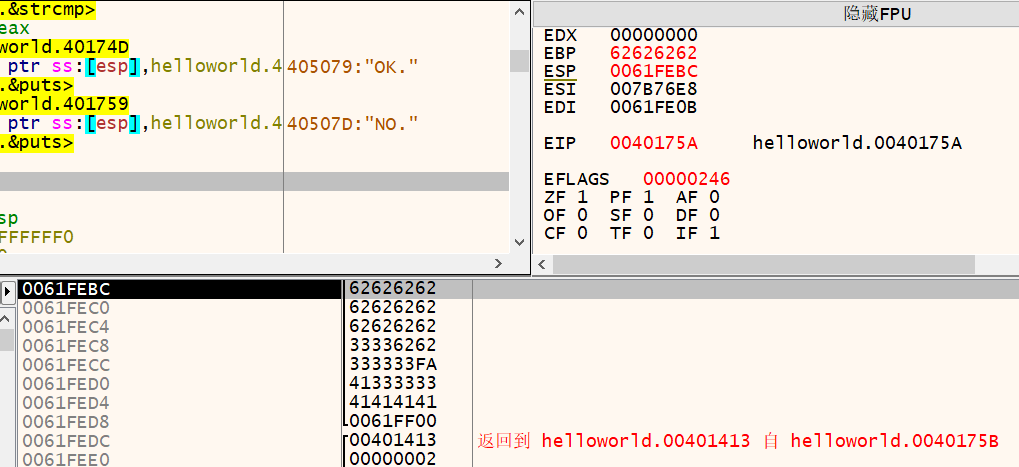
刚好修改了EBP寄存器导出错误,很明显的栈溢出。
具体的EXP构造方法就是使用SEH加载shellcode,具体的在之前的文章已经写过了
写出exp
payload = b"" |
参考