Joe1sn's Cabinet

【源码分析】AFL源代码分析

其实还是挺简单的

image-20230722090502823

在一次期末报告里面做了这个报告

关于AFL的基本步骤

工作流程基本上可以用 5 个步骤来描述:预处理、输入构建、输入选择、评估、后模糊测试。 真正的内核处理是步骤 2 到 4

  • 预处理

    分析和获取有用信息,使用PIN,符号执行,污点检查

    黑盒白盒

  • 输入构建

    从数据 S(种子)产生大量变异数据 I。

  • 输入选择

    过滤无效数据,优化模糊测试

  • 评估

    大多数关于模糊的研究集中在两个指标上:覆盖率和利用漏洞的平均时间

源码分析

编译插桩

afl-gcc

根据使用方法,首先是使用afl-gcc进行编译,在编译时就完成插桩

image-20230722090843228

本就是是包裹的GCC盒CLANG

1
2
3
4
5
6
7
8
9
10
11
12
13
14
15
16
17
18
19
20
21
22
23
24
25
26
27
28
29
30
31
32
33
34
35
36
37
int main(int argc, char** argv) {

if (isatty(2) && !getenv("AFL_QUIET")) {

SAYF(cCYA "afl-cc " cBRI VERSION cRST " by <[email protected]>\n");

} else be_quiet = 1;

if (argc < 2) {

SAYF("\n"
"This is a helper application for afl-fuzz. It serves as a drop-in replacement\n"
"for gcc or clang, letting you recompile third-party code with the required\n"
"runtime instrumentation. A common use pattern would be one of the following:\n\n"

" CC=%s/afl-gcc ./configure\n"
" CXX=%s/afl-g++ ./configure\n\n"

"You can specify custom next-stage toolchain via AFL_CC, AFL_CXX, and AFL_AS.\n"
"Setting AFL_HARDEN enables hardening optimizations in the compiled code.\n\n",
BIN_PATH, BIN_PATH);

exit(1);

}

find_as(argv[0]);

edit_params(argc, argv);

execvp(cc_params[0], (char**)cc_params);

FATAL("Oops, failed to execute '%s' - check your PATH", cc_params[0]);

return 0;

}

SAYF就是fprintf函数,检测到参数小于2的时候报错并退出

  • 使用find_as进行参数的解析到自身程序路径,找到afl-as的afl汇编器
  • edit_params中,解析参数,设置自生对应的编译器,获得和设置一系列环境变量,最后得到的cc_params就是编译参数
  • execvp(cc_params[0], (char**)cc_params);,通过前面找到的汇编器as_path和参数创建进程进行插桩编译。(具体就是替换了程序名称之类的,源码很简单)

afl-as

main

进入main创建了一些列变量然后就是在a 中将 cc_params 转为as_params

add_instrumentation

重头函数

1
2
3
4
5
6
7
8
9
10
11
12
13
14
15
16
17
18
19
20
while (fgets(line, MAX_LINE, inf)) {

/* In some cases, we want to defer writing the instrumentation trampoline
until after all the labels, macros, comments, etc. If we're in this
mode, and if the line starts with a tab followed by a character, dump
the trampoline now. */

if (!pass_thru && !skip_intel && !skip_app && !skip_csect && instr_ok &&
instrument_next && line[0] == '\t' && isalpha(line[1])) {

fprintf(outf, use_64bit ? trampoline_fmt_64 : trampoline_fmt_32,
R(MAP_SIZE));

instrument_next = 0;
ins_lines++;

}
....
....
}

所以,AFL的代码插桩,就是在将源文件编译为汇编代码后,通过afl-as完成。开始重写汇编指令,准备在分支处插入代码

先看看32位,64位和这个也差不多

trampoline_fmt_32

1
2
3
4
5
6
7
8
9
10
11
12
13
14
15
16
17
18
19
20
21
22
static const u8* trampoline_fmt_32 =

"\n"
"/* --- AFL TRAMPOLINE (32-BIT) --- */\n"
"\n"
".align 4\n"
"\n"
"leal -16(%%esp), %%esp\n"
"movl %%edi, 0(%%esp)\n"
"movl %%edx, 4(%%esp)\n"
"movl %%ecx, 8(%%esp)\n"
"movl %%eax, 12(%%esp)\n"
"movl $0x%08x, %%ecx\n"
"call __afl_maybe_log\n"
"movl 12(%%esp), %%eax\n"
"movl 8(%%esp), %%ecx\n"
"movl 4(%%esp), %%edx\n"
"movl 0(%%esp), %%edi\n"
"leal 16(%%esp), %%esp\n"
"\n"
"/* --- END --- */\n"
"\n";

这就是汇编,听chatGPT说

1
2
3
4
5
6
7
8
9
10
11
12
13
14
15
16
section .text
global _start

_start:
lea esp, [esp-16] ; leal -16(%esp), %esp
mov [esp], edi ; movl %edi, 0(%esp)
mov [esp+4], edx ; movl %edx, 4(%esp)
mov [esp+8], ecx ; movl %ecx, 8(%esp)
mov [esp+12], eax ; movl %eax, 12(%esp)
mov ecx, 0x08000000 ; movl $0x%08x, %ecx
call __afl_maybe_log ; call __afl_maybe_log
mov eax, [esp+12] ; movl 12(%esp), %eax
mov ecx, [esp+8] ; movl 8(%esp), %ecx
mov edx, [esp+4] ; movl 4(%esp), %edx
mov edi, [esp] ; movl 0(%esp), %edi
lea esp, [esp+16] ; leal 16(%esp), %esp

32位是经典的栈传参,这里使用对esp的移动实现了从edi edx ecx eax的保存,然后又将ecx设置为了0x08000000,这个是chatGPT翻译错了,正确的理解是"%08x" 是格式说明符,用于将一个整数格式化为一个带有前导零的 8 位十六进制数。例如,“%08x” 将把数字 10 格式化为 “0000000A”。这段汇编仍然是属于C语言的范畴。

似乎我们下一步要看的是__afl_maybe_log,**但是你就没想过R(MAP_SIZE)**有什么用吗?R(x)的定义是(random() % (x)),所以R(MAP_SIZE)即为0到MAP_SIZE之间的一个随机数。

因此,在处理到某个分支,需要插入桩代码时,afl-as会生成一个随机数,作为运行时保存在ecx中的值。而这个随机数,便是用于标识这个代码块的key。

接下来来到__afl_maybe_log

运行

开始fuzz,那么afl如何启动这个程序,可以看看afl-fuzz.c,不过最开始后世设置参数,这里将重要点的部分。

调用的链条有点复杂首先在L8044

1
skipped_fuzz = fuzz_one(use_argv);

然后的fuzz_one中,使用队列queue_cur来管理

1
res = calibrate_case(argv, queue_cur, in_buf, queue_cycle - 1, 0);

calibrate_case

1
2
if (dumb_mode != 1 && !no_forkserver && !forksrv_pid)
init_forkserver(argv);

总算是找到了

为了更高效地进行上述过程,AFL实现了一套fork server机制。其基本思路是:启动target进程后,target会运行一个fork server;fuzzer并不负责fork子进程,而是与这个fork server通信,并由fork server来完成fork及继续执行目标的操作。这样设计的最大好处,就是不需要调用execve(),从而节省了载入目标文件和库、解析符号地址等重复性工作

L1987

1
2
3
int st_pipe[2], ctl_pipe[2];
....
forksrv_pid = fork();

使用pipe和forkserver进行通讯

L2088的位置开始执行execv(target_path, argv);。其实看到这里我也很疑惑上面的解释

在L2103中测试和forkserver的通讯

1
2
3
4
5
6
7
8
9
10
11
    fsrv_ctl_fd = ctl_pipe[1];
fsrv_st_fd = st_pipe[0];
rlen = read(fsrv_st_fd, &status, 4);
...
/* If we have a four-byte "hello" message from the server, we're all set.
Otherwise, try to figure out what went wrong. */

if (rlen == 4) {
OKF("All right - fork server is up.");
return;
}

接下来的fork server是如何与fuzzer通信是面试考点(/doge)

forkserver

知道创宇不知道是讲的太碎了还是我理解有问题,在这里我就不怎么追的了代码了,不过想起开始说过的:fuzzer并不负责fork子进程,而是与这个fork server通信,并由fork server来完成fork及继续执行目标的操作,那么很有可能和插进去的__afl_maybe_log一样是插入入进去了一个forkserver在代码当中,那么回到afl-as,L446

1
2
if (ins_lines)
fputs(use_64bit ? main_payload_64 : main_payload_32, outf);

依然以32位举例子main_payload_32

1
2
3
4
5
6
7
8
9
10
11
12
13
14
15
16
17
18
19
20
21
"__afl_forkserver:\n"
"\n"
" /* Enter the fork server mode to avoid the overhead of execve() calls. */\n"
"\n"
" pushl %eax\n"
" pushl %ecx\n"
" pushl %edx\n"
"\n"
" /* Phone home and tell the parent that we're OK. (Note that signals with\n"
" no SA_RESTART will mess it up). If this fails, assume that the fd is\n"
" closed because we were execve()d from an instrumented binary, or because\n"
" the parent doesn't want to use the fork server. */\n"
"\n"
" pushl $4 /* length */\n"
" pushl $__afl_temp /* data */\n"
" pushl $" STRINGIFY((FORKSRV_FD + 1)) " /* file desc */\n"
" call write\n"
" addl $12, %esp\n"
"\n"
" cmpl $4, %eax\n"
" jne __afl_fork_resume\n"

看注释也看的明白了,给fuzzer说已经准备完毕,其中$__afl_temp就是四字节长度的验证信息,然后开始等待循环,读取命令管道,直到fuzzer通知其开始

1
2
3
4
5
6
7
8
9
10
11
12
"__afl_fork_wait_loop:\n"
"\n"
" /* Wait for parent by reading from the pipe. Abort if read fails. */\n"
"\n"
" pushl $4 /* length */\n"
" pushl $__afl_temp /* data */\n"
" pushl $" STRINGIFY(FORKSRV_FD) " /* file desc */\n"
" call read\n"
" addl $12, %esp\n"
"\n"
" cmpl $4, %eax\n"
" jne __afl_die\n"

有错误就寄__afl_die,那么成功的话

1
2
3
4
5
6
7
8
9
10
"  /* Once woken up, create a clone of our process. This is an excellent use\n"
" case for syscall(__NR_clone, 0, CLONE_PARENT), but glibc boneheadedly\n"
" caches getpid() results and offers no way to update the value, breaking\n"
" abort(), raise(), and a bunch of other things :-( */\n"
"\n"
" call fork\n"
"\n"
" cmpl $0, %eax\n"
" jl __afl_die\n"
" je __afl_fork_resume\n"

得到父子进程的ID,对待子进程走到__afl_fork_resume

1
2
3
4
5
6
7
8
9
10
11
12
13
14
15
16
"__afl_fork_resume:\n"
"\n"
" /* In child process: close fds, resume execution. */\n"
"\n"
" pushl $" STRINGIFY(FORKSRV_FD) "\n"
" call close\n"
"\n"
" pushl $" STRINGIFY((FORKSRV_FD + 1)) "\n"
" call close\n"
"\n"
" addl $8, %esp\n"
"\n"
" popl %edx\n"
" popl %ecx\n"
" popl %eax\n"
" jmp __afl_store\n"

对于大于0的返回值(即父进程)他继续运行

1
2
3
4
5
6
7
8
9
10
11
12
13
14
15
16
17
18
19
20
21
22
23
24
25
26
27
28
"  /* In parent process: write PID to pipe, then wait for child. */\n"
"\n"
" movl %eax, __afl_fork_pid\n"
"\n"
" pushl $4 /* length */\n"
" pushl $__afl_fork_pid /* data */\n"
" pushl $" STRINGIFY((FORKSRV_FD + 1)) " /* file desc */\n"
" call write\n"
" addl $12, %esp\n"
"\n"
" pushl $0 /* no flags */\n"
" pushl $__afl_temp /* status */\n"
" pushl __afl_fork_pid /* PID */\n"
" call waitpid\n"
" addl $12, %esp\n"
"\n"
" cmpl $0, %eax\n"
" jle __afl_die\n"
"\n"
" /* Relay wait status to pipe, then loop back. */\n"
"\n"
" pushl $4 /* length */\n"
" pushl $__afl_temp /* data */\n"
" pushl $" STRINGIFY((FORKSRV_FD + 1)) " /* file desc */\n"
" call write\n"
" addl $12, %esp\n"
"\n"
" jmp __afl_fork_wait_loop\n"

继续进行forkserver的管道通讯,然后__afl_fork_wait_loop

fuzzer

回顾一下目前“栈”的情况:main -> calibrate_case -> init_forkserver

image-20230722112212761

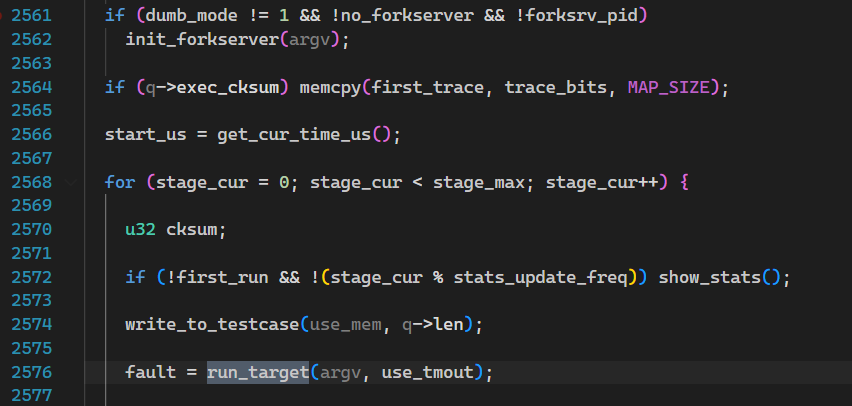
​ 回退到calibrate_case继续执行,write_to_testcase就是设置测试样例,重点在于run_target。AFL的文件编译策略不是胡乱变换的,主要是dumb_mode有没有被开启,一般都是不会开启的,那么就来到了L2362

1
2
3
4
5
6
7
8
9
10
11
12
13
14
15
16
17
18
19
20
21
22
  s32 res;

/* In non-dumb mode, we have the fork server up and running, so simply
tell it to have at it, and then read back PID. */

if ((res = write(fsrv_ctl_fd, &prev_timed_out, 4)) != 4) {

if (stop_soon) return 0;
RPFATAL(res, "Unable to request new process from fork server (OOM?)");

}

if ((res = read(fsrv_st_fd, &child_pid, 4)) != 4) {

if (stop_soon) return 0;
RPFATAL(res, "Unable to request new process from fork server (OOM?)");

}

if (child_pid <= 0) FATAL("Fork server is misbehaving (OOM?)");

}

看注释和代码,知道通过管道向forkserver通知准备完毕,并得到返回的PID,然后就是L2438

1
2
3
4
5
6
7
8
9
if (WIFSIGNALED(status) && !stop_soon) {

kill_signal = WTERMSIG(status);

if (child_timed_out && kill_signal == SIGKILL) return FAULT_TMOUT;

return FAULT_CRASH;

}

fuzzer再次读取状态管道,获取子进程退出状态,并由此来判断子进程结束的原因,例如正常退出、超时、崩溃等,并进行相应的记录

共享内存机制

解决程序插桩和启动运行后,就来到了对示例的fuzz阶段。在程序待测试部分,程序先是初始化变异方式。AFL通过共享内存机制来方便高并发的样例读取,减小IO的损耗。
代码不长这里贴一下

1
2
3
4
5
6
7
8
9
10
11
12
13
14
15
16
17
18
19
20
21
22
23
24
25
26
27
28
29
30
31
EXP_ST void setup_shm(void) {

u8* shm_str;

if (!in_bitmap) memset(virgin_bits, 255, MAP_SIZE);

memset(virgin_tmout, 255, MAP_SIZE);
memset(virgin_crash, 255, MAP_SIZE);

shm_id = shmget(IPC_PRIVATE, MAP_SIZE, IPC_CREAT | IPC_EXCL | 0600);

if (shm_id < 0) PFATAL("shmget() failed");

atexit(remove_shm);

shm_str = alloc_printf("%d", shm_id);

/* If somebody is asking us to fuzz instrumented binaries in dumb mode,
we don't want them to detect instrumentation, since we won't be sending
fork server commands. This should be replaced with better auto-detection
later on, perhaps? */

if (!dumb_mode) setenv(SHM_ENV_VAR, shm_str, 1);

ck_free(shm_str);

trace_bits = shmat(shm_id, NULL, 0);

if (!trace_bits) PFATAL("shmat() failed");

}

afl-fuzz的L7955来到setup_shm,这里设置共享内存,然后从shemget()(这是一个LinuxC的函数)获得一块内存。

shmget() returns the identifier of the System V shared memory segment associated with the value of the argu‐
ment key. A new shared memory segment, with size equal to the value of size rounded up to a multiple of
PAGE_SIZE, is created if key has the value IPC_PRIVATE or key isn’t IPC_PRIVATE, no shared memory segment cor‐
responding to key exists, and IPC_CREAT is specified in shmflg.

子进程通过环境变量SHM_ENV_VAR得到内存,对于fuzzer本身则会回到trace_bits保存内存地址

shmat() attaches the System V shared memory segment identified by shmid to the address space of the calling
process.

我们在且回到被测试的target中,看下他被插桩的代码(早于之前的forkserver)

1
2
3
4
5
6
"  /* Check if SHM region is already mapped. */\n"
"\n"
" movl __afl_area_ptr, %edx\n"
" testl %edx, %edx\n"
" je __afl_setup\n"
"\n"
  • __afl_area_ptr:共享内存映射到target的内存空间中的地址

  • __afl_setup:获取环境变量AFL_SHM_ENV的内容并将其转为整型,最后,通过调用shmat(),target将这块共享内存也映射到了自己的内存空间中,并将其地址保存在__afl_area_ptredx

    1
    2
    3
    4
    5
    6
    7
    8
    9
    10
    11
    12
    13
    14
    15
    16
    17
    18
    19
    20
    21
    22
    23
    24
    25
    26
    27
    28
    29
    30
    31
    32
    33
    34
    "\n"
    "__afl_setup:\n"
    "\n"
    " /* Do not retry setup if we had previous failures. */\n"
    "\n"
    " cmpb $0, __afl_setup_failure\n"
    " jne __afl_return\n"
    "\n"
    " /* Map SHM, jumping to __afl_setup_abort if something goes wrong.\n"
    " We do not save FPU/MMX/SSE registers here, but hopefully, nobody\n"
    " will notice this early in the game. */\n"
    "\n"
    " pushl %eax\n"
    " pushl %ecx\n"
    "\n"
    " pushl $.AFL_SHM_ENV\n"
    " call getenv\n"
    " addl $4, %esp\n"
    "\n"
    " testl %eax, %eax\n"
    " je __afl_setup_abort\n"
    "\n"
    " pushl %eax\n"
    " call atoi\n"
    " addl $4, %esp\n"
    "\n"
    " pushl $0 /* shmat flags */\n"
    " pushl $0 /* requested addr */\n"
    " pushl %eax /* SHM ID */\n"
    " call shmat\n"
    " addl $12, %esp\n"
    "\n"
    " cmpl $-1, %eax\n"
    " je __afl_setup_abort\n"

分支信息的记录

来到文章开始抛出的疑问__afl_maybe_log干了什么

1
2
3
4
5
6
7
8
9
10
11
12
"__afl_maybe_log:\n"
"\n"
" lahf\n"
" seto %al\n"
"\n"
" /* Check if SHM region is already mapped. */\n"
"\n"
" movl __afl_area_ptr, %edx\n"
" testl %edx, %edx\n"
" je __afl_setup\n"
"\n"
"__afl_store:\n"

读代码就知道了:

  • 检查共享内存的映射,有错进入到__afl_setup

  • 开始__afl_store

    1
    2
    3
    4
    5
    6
    7
    8
    9
    10
    11
    12
    13
    14
    15
    16
    17
    18
    19
    20
    21
      "__afl_store:\n"
    "\n"
    " /* Calculate and store hit for the code location specified in ecx. There\n"
    " is a double-XOR way of doing this without tainting another register,\n"
    " and we use it on 64-bit systems; but it's slower for 32-bit ones. */\n"
    "\n"
    #ifndef COVERAGE_ONLY
    " movl __afl_prev_loc, %edi\n"
    " xorl %ecx, %edi\n"
    " shrl $1, %ecx\n"
    " movl %ecx, __afl_prev_loc\n"
    #else
    " movl %ecx, %edi\n"
    #endif /* ^!COVERAGE_ONLY */
    "\n"
    #ifdef SKIP_COUNTS
    " orb $1, (%edx, %edi, 1)\n"
    #else
    " incb (%edx, %edi, 1)\n"
    #endif /* ^SKIP_COUNTS */
    "\n"
    • __afl_prev_loc:前一次跳转的”位置”
    • ecx:最开始插桩的随机数位置,即代码块的标号

    因此,AFL为每个代码块生成一个随机数,作为其“位置”的记录;随后,对分支处的”源位置“和”目标位置“进行异或,并将异或的结果作为该分支的key,保存每个分支的执行次数。用于保存执行次数的实际上是一个哈希表,大小为MAP_SIZE=64K,当然会存在碰撞的问题;但根据AFL文档中的介绍,对于不是很复杂的目标,碰撞概率还是可以接受的:

    在最后map density就是指的哈希表的密度,越小发生碰撞的概率越小

分支信息的分析

前文提到了

  • trace_bits保存了共享内存
  • 共享内存保存了分析记录

那么,对于AFL从这块共享内存中获得信息就显得很合理了

在预处理共享内存时

1
2
3
4
5
6
7
8
9
10
11
12
13
14
15
16
17
18
19
20
static inline void classify_counts(u32* mem) {

u32 i = MAP_SIZE >> 2;

while (i--) {

/* Optimize for sparse bitmaps. */

if (unlikely(*mem)) {

u16* mem16 = (u16*)mem;

mem16[0] = count_class_lookup16[mem16[0]];
mem16[1] = count_class_lookup16[mem16[1]];

}
mem++;
}

}
1
2
3
4
5
6
7
8
9
10
11
12
13
14
15
16
/* Destructively classify execution counts in a trace. This is used as a
preprocessing step for any newly acquired traces. Called on every exec,
must be fast. */
static const u8 count_class_lookup8[256] = {

[0] = 0,
[1] = 1,
[2] = 2,
[3] = 4,
[4 ... 7] = 8,
[8 ... 15] = 16,
[16 ... 31] = 32,
[32 ... 127] = 64,
[128 ... 255] = 128

};

最重要的是count_class_lookup8,target是将每个分支的执行次数用1个byte来储存,而fuzzer则进一步把这个执行次数归入buckets中,比如执行1次,mem16 = count_class_lookup8[1]; == 1

执行3次mem16 = count_class_lookup8[3]; == 4。执行4次mem16 = count_class_lookup8[4]; == 8

好处就在于分支A执行了32次;对另外一个测试用例,分支A执行了33次,那么AFL就会认为这两次的代码覆盖是相同的。这样通过代码块的执行次数就可以统计相关路径,AFL根据相关路径的HASH判断路径是否发生改变。

文件变异规则

看到好多研究生论文都是从这里下手的。。。

  • bitflip,按位翻转,1变为0,0变为1

    在对每个byte进行翻转时,如果其造成执行路径与原始路径不一致,就将该byte在effector map中标记为1,即“有效”的,否则标记为0,即“无效”的

  • arithmetic,整数加/减算术运算

    对目标整数会进行+1, +2, …, +35, -1, -2, …, -35的变异。特别地,由于整数存在大端序和小端序两种表示方式,AFL会贴心地对这两种整数表示方式都进行变异。

  • interest,把一些特殊内容替换到原文件中

    用于替换的"interesting values",是AFL预设的一些比较特殊的数。

    config.h

    1
    2
    3
    4
    5
    6
    7
    8
    9
    10
    11
    12
    13
    14
    15
    16
    17
    18
    19
    20
    21
    22
    23
    24
    25
    26
    27
    28
    29
    30
    31
    32
    #define INTERESTING_8 \
    -128, /* Overflow signed 8-bit when decremented */ \
    -1, /* */ \
    0, /* */ \
    1, /* */ \
    16, /* One-off with common buffer size */ \
    32, /* One-off with common buffer size */ \
    64, /* One-off with common buffer size */ \
    100, /* One-off with common buffer size */ \
    127 /* Overflow signed 8-bit when incremented */

    #define INTERESTING_16 \
    -32768, /* Overflow signed 16-bit when decremented */ \
    -129, /* Overflow signed 8-bit */ \
    128, /* Overflow signed 8-bit */ \
    255, /* Overflow unsig 8-bit when incremented */ \
    256, /* Overflow unsig 8-bit */ \
    512, /* One-off with common buffer size */ \
    1000, /* One-off with common buffer size */ \
    1024, /* One-off with common buffer size */ \
    4096, /* One-off with common buffer size */ \
    32767 /* Overflow signed 16-bit when incremented */

    #define INTERESTING_32 \
    -2147483648LL, /* Overflow signed 32-bit when decremented */ \
    -100663046, /* Large negative number (endian-agnostic) */ \
    -32769, /* Overflow signed 16-bit */ \
    32768, /* Overflow signed 16-bit */ \
    65535, /* Overflow unsig 16-bit when incremented */ \
    65536, /* Overflow unsig 16 bit */ \
    100663045, /* Large positive number (endian-agnostic) */ \
    2147483647 /* Overflow signed 32-bit when incremented */
  • dictionary,把自动生成或用户提供的token替换/插入到原文件中(从头开始)

    -x选项设置的token

  • havoc,中文意思是“大破坏”,此阶段会对原文件进行大量变异,具体见下文

    开始智力下降,我在fuzz中看到的大多数都是这个阶段(阿巴阿巴)

    • 随机选取某个bit进行翻转
    • 随机选取某个byte,将其设置为随机的interesting value
    • 随机选取某个word,并随机选取大、小端序,将其设置为随机的interesting value
    • 随机选取某个dword,并随机选取大、小端序,将其设置为随机的interesting value
    • 随机选取某个byte,对其减去一个随机数
    • 随机选取某个byte,对其加上一个随机数
    • 随机选取某个word,并随机选取大、小端序,对其减去一个随机数
    • 随机选取某个word,并随机选取大、小端序,对其加上一个随机数
    • 随机选取某个dword,并随机选取大、小端序,对其减去一个随机数
    • 随机选取某个dword,并随机选取大、小端序,对其加上一个随机数
    • 随机选取某个byte,将其设置为随机数
    • 随机删除一段bytes
    • 随机选取一个位置,插入一段随机长度的内容,其中75%的概率是插入原文中随机位置的内容,25%的概率是插入一段随机选取的数
    • 随机选取一个位置,替换为一段随机长度的内容,其中75%的概率是替换成原文中随机位置的内容,25%的概率是替换成一段随机选取的数
    • 随机选取一个位置,用随机选取的token(用户提供的或自动生成的)替换
    • 随机选取一个位置,用随机选取的token(用户提供的或自动生成的)插入
  • splice,中文意思是“绞接”,此阶段会将两个文件拼接起来得到一个新的文件

    splice是将两个seed文件拼接得到新的文件,并对这个新文件继续执行havoc变异

  • cycle:对队列所有文件全部按照上面的步骤来一遍就算完成了一个cycle,整个队列又会从第一个文件开始,再次进行变异,不过与第一次变异不同的是,这一次就不需要再进行deterministic fuzzing了。

参考

https://paper.seebug.org/496/

https://github.com/google/AFL