开始做HEVD来熟悉windows的内核漏洞利用方式时,发现大多数的资料依旧基于windows7,但是目前主流的操作系统已经是win10,所以还是得更上时代潮流的
文章已在先知社区投稿:https://xz.aliyun.com/t/13363
0. 前置环境
更基础
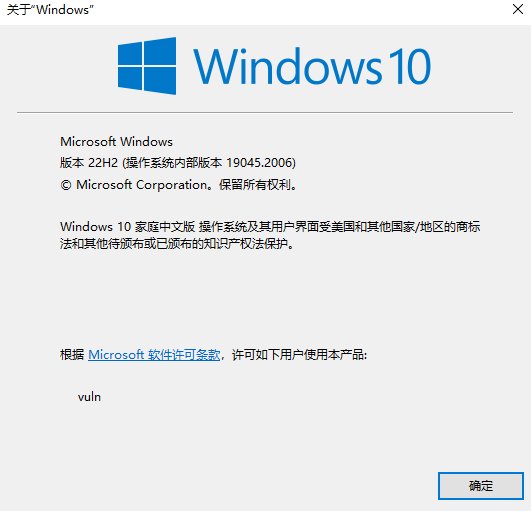
我使用的Windows版本是
I. 编程环境
如果你想快速搭建一个驱动开发环境可以参考B站上的一些资料,如:配置驱动开发环境
如果按照步骤vs没有KernelModDriver这一模板,找到vs目录的WDK.vsix双击即可
一段驱动的主要代码,在main.cpp中编写
1
2
3
4
5
6
7
8
9
10
11
12
13
14
15
16
17
18
19
20
21
| #include <ntifs.h>
#include "win10.h"
#include "x64.h"
VOID
DriverUnload(PDRIVER_OBJECT DriverObject)
{
UNREFERENCED_PARAMETER(DriverObject);
DbgPrint("Driver Stopping -> %wZ\n", &DriverObject->DriverName);
}
NTSTATUS
DriverEntry(PDRIVER_OBJECT DriverObject, PUNICODE_STRING RegistryPath)
{
UNREFERENCED_PARAMETER(RegistryPath);
DbgPrint("Driver Running -> %wZ\n", &DriverObject->DriverName);
DriverObject->DriverUnload = DriverUnload;
return STATUS_SUCCESS;
}
|
规定了驱动加载和卸载的两个函数,并在加载和卸载时打印调试信息

II. 调试环境
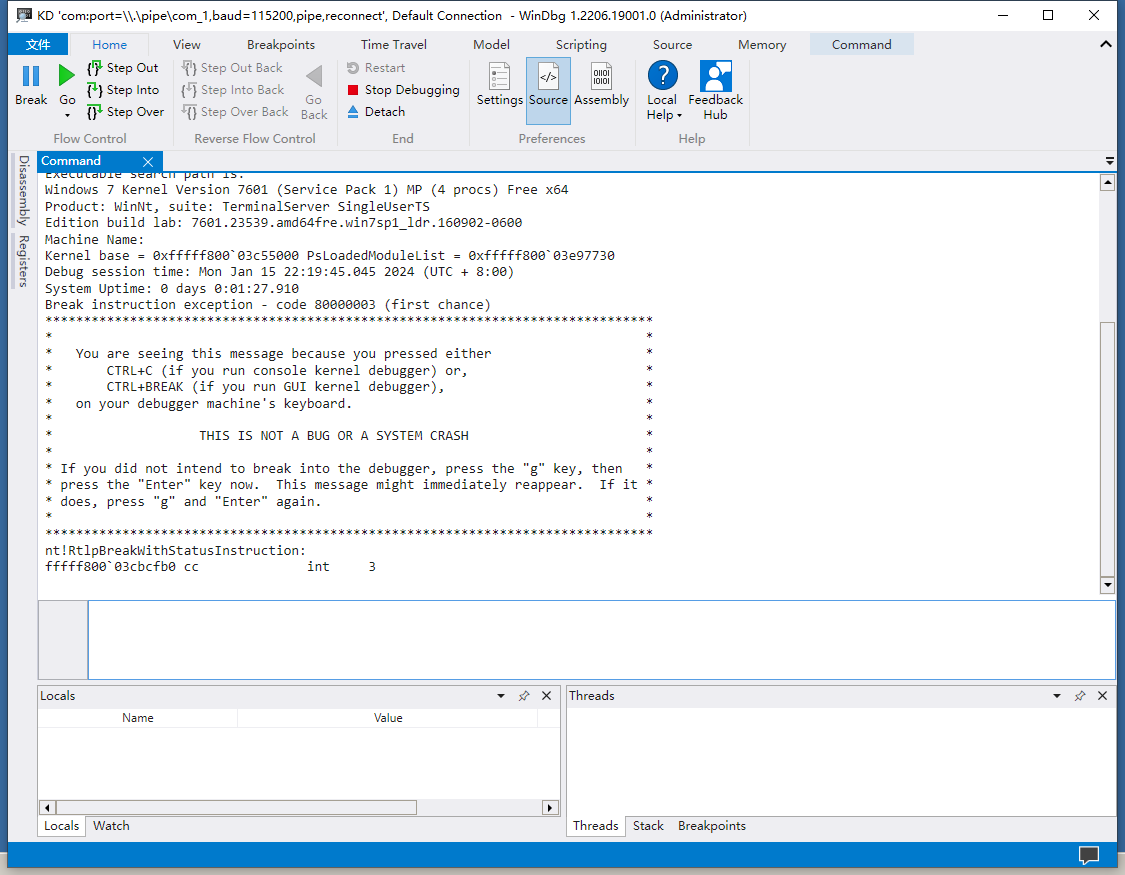
传统串口调试
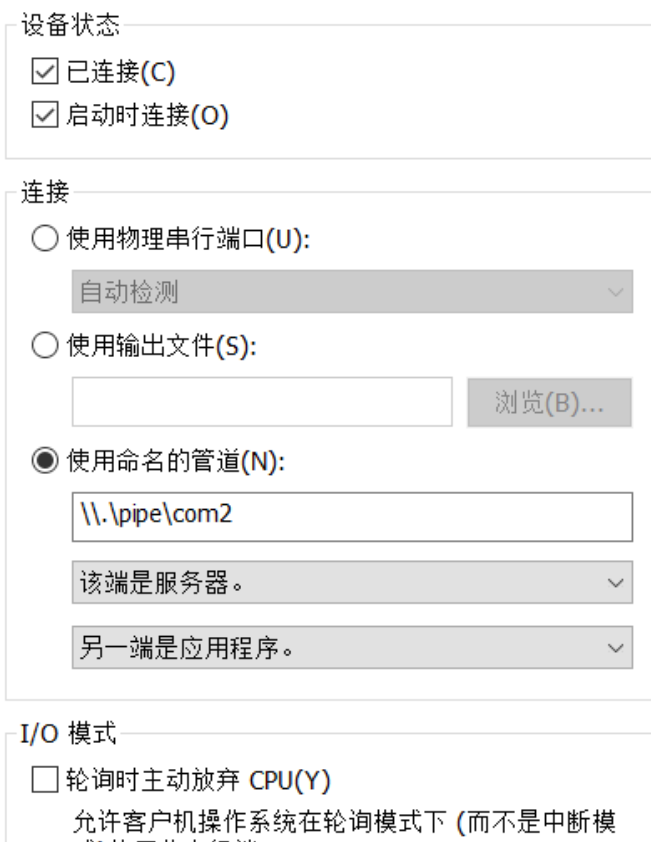
添加串口
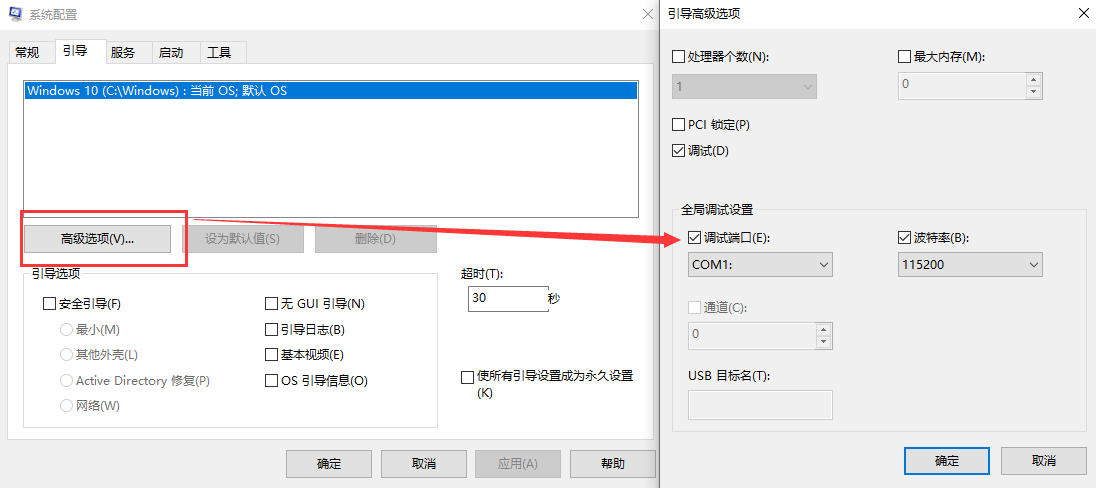
在虚拟机中Win+R召唤msconfig,打开允许串口调试
然后在(记得用管理员打开)windbg中按照图中配置即可,其他选项不变
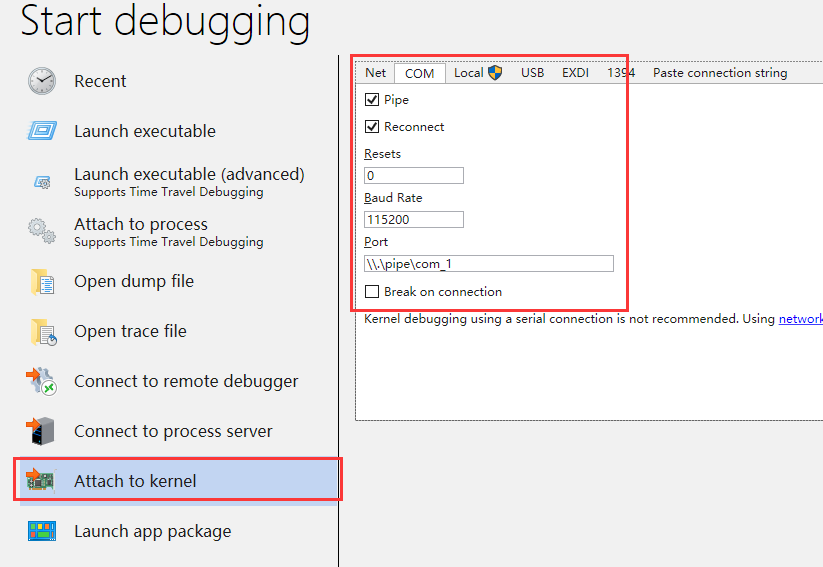
一直找不到管道的话可以点Break再等会儿就有了
VirtualKD法调试
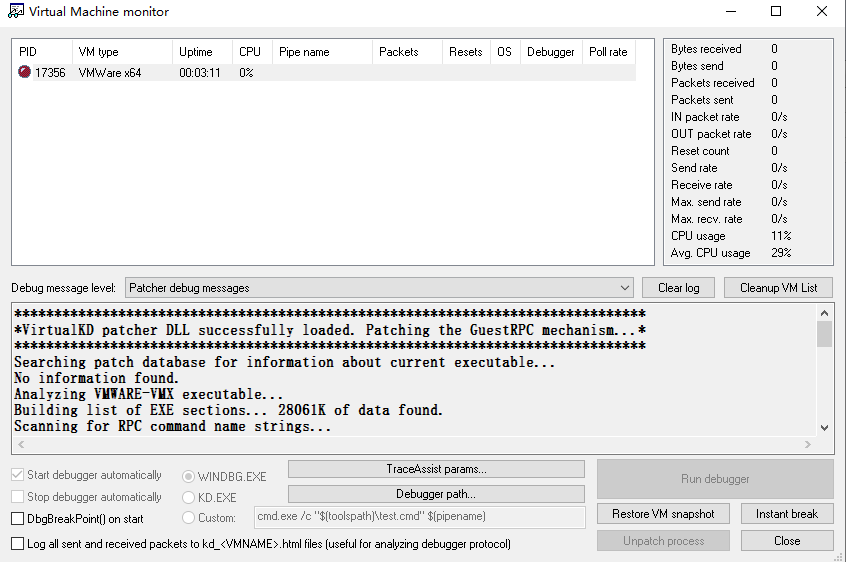
项目链接:http://virtualkd.sysprogs.org/
安装后,vmmon64.exe就行了
但是用了就不能用串口调试了
打开信息显示+DbgView
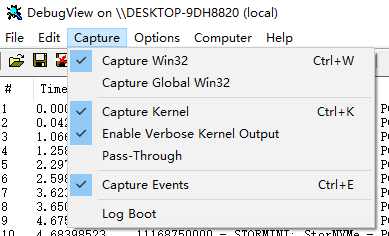
在\HKEY_LOCAL_MACHINE\SYSTEM\CurrentControlSet\Control\Session Manager\注册表中添加Debug Print Filter,并设置一个Default的DWORD值,你可以将其设置为0x8或者允许更多调试信息的0xf

虽然说windbg确实能打印出DbgPrint,但是HEVD使用的是DbgPrintEx,接受不到,安装了DbgView后,他会把调试信息打印出了并且windbg也能收到
调试指令
如果出现了以下情况且虚拟机卡顿,可以使用这两个指令关闭输出

1
2
| 1: kd> ed nt!Kd_SXS_Mask 0
1: kd> ed nt!Kd_FUSION_Mask 0
|
关闭这两个函数的输出,莫名其妙变卡的话再用一下
III. 驱动加载
使用KmdManager.exe,毛子的黑科技,使用时需要管理员启动
也可以使用osLoader啥的
这里用KmdKit的KmdManager演示,运行HEVD
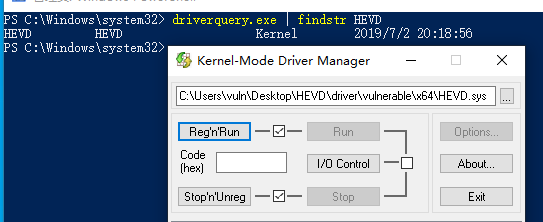
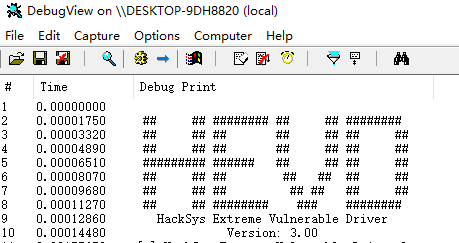
那么就算搭建成功
A. 编程基础
关于内核模式驱动程序:https://learn.microsoft.com/zh-cn/windows-hardware/drivers/kernel/
内核中交互是通过IRP请求进行交互的
IRP 结构是表示 I/O 请求数据包的部分不透明结构。 IRP 结构的未记录成员是保留的,仅由 I/O 管理器使用,在某些情况下,由文件系统驱动程序 (FSD) 使用。
MSDN:https://learn.microsoft.com/zh-cn/windows-hardware/drivers/ddi/wdm/ns-wdm-_irp
使用到的内存堆栈为I/O Stack
I/O 管理器为分层驱动程序链中的每个驱动程序提供其设置的每个 IRP 的 I/O 堆栈位置。 每个 I/O 堆栈位置都包含 一个IO_STACK_LOCATION结构。
MSDN:https://learn.microsoft.com/zh-cn/windows-hardware/drivers/kernel/i-o-stack-locations
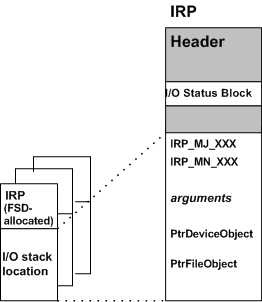
IRP通过iostack发送给设备,对应的是应用层的“消息”。设备可以存在(硬盘等),也可以不存在(QQ Protect驱动等)。
根据上图,应用层通过和设备对象(FDO)进行交互,设备(PDO)再和设备对象交互,实现交互。同时FDO向PDO的交互不是必要的。
HAL 硬件抽象层
HAL通常是一个独立的动态链接库,windows自身携带多种HAL,但是在系统安装的时候只会选择一种,名为hal.dll。涉及中断控制器、单处理器/多处理器硬件断点。

B. 代码
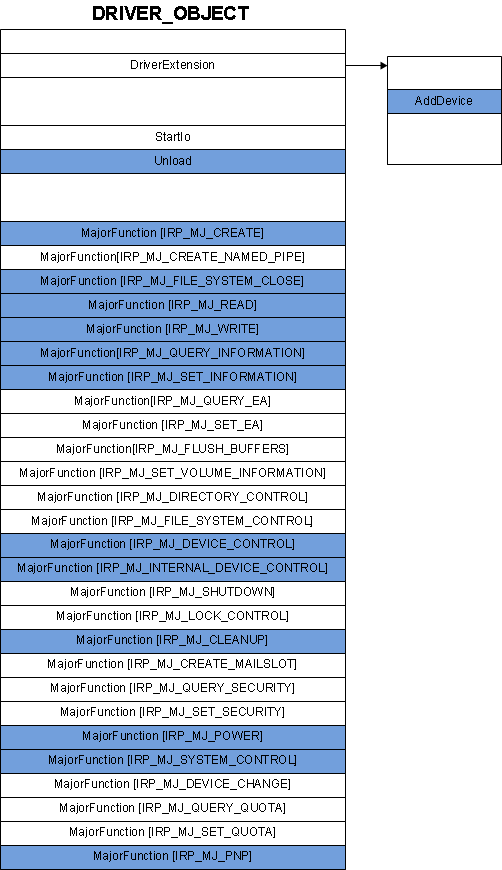
创建设备
MSDN:https://learn.microsoft.com/en-us/windows-hardware/drivers/kernel/device-tree
使用DeviceTree,可以找到:https://web.archive.org/web/20200519214156/http://www.osronline.com/OsrDown.cfm/devicetree_v230.zip
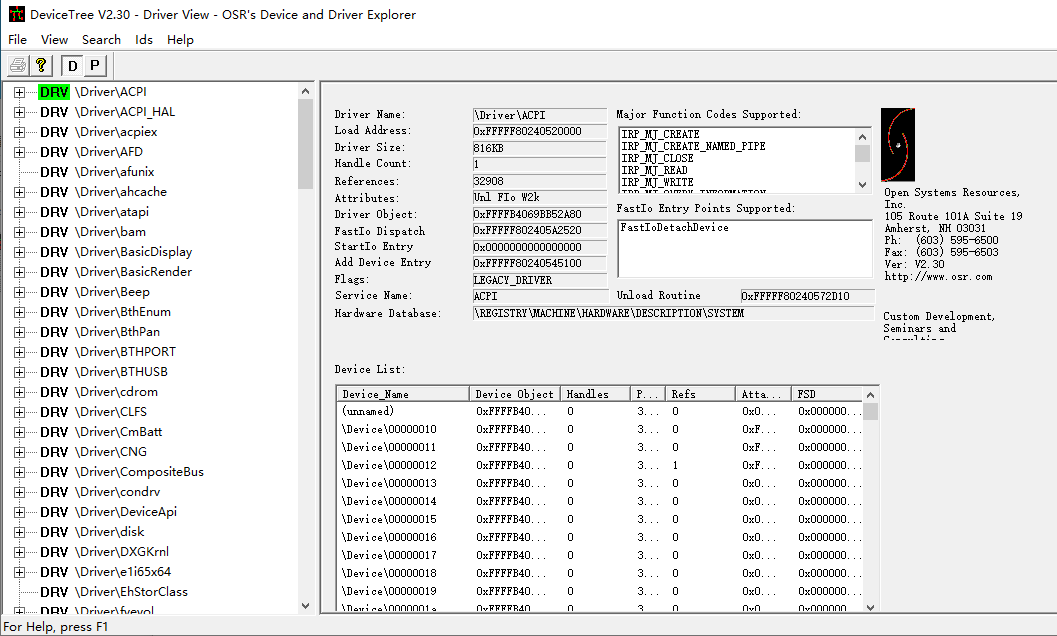
1
2
3
4
5
6
7
8
| UNICODE_STRING DeviceName = { 0 };
PDEVICE_OBJECT pDevice = NULL;
RtlInitUnicodeString(&DeviceName, DEVICE_NAME);
Status = IoCreateDevice(DriverObject, 0, &DeviceName, FILE_DEVICE_UNKNOWN, 0, TRUE, &pDevice);
if (!NT_SUCCESS(Status)) {
DbgPrint("Create Device Failed: %x\n", Status);
return Status;
}
|
创建符号链接


符号链接就是类似与Z:\之前的前缀
使用WinObj可以看到,我用的再第一章中下载的KdmKie中的SymLinks(太老了,建议换一个)

1
2
3
4
5
6
7
8
| UNICODE_STRING SymLink = { 0 };
RtlInitUnicodeString(&SymLink, SYM_NAME);
Status = IoCreateSymbolicLink(&SymLink, &DeviceName);
if (!NT_SUCCESS(Status)) {
DbgPrint("Create Symbol Link Failed: %x\n", Status);
IoDeleteDevice(pDevice);
return Status;
}
|
关联功能的交互
I. 创建“句柄”

MSDN:https://learn.microsoft.com/zh-cn/windows-hardware/drivers/gettingstarted/minidrivers-and-driver-pairs
具体调试方法也在上面的文档中
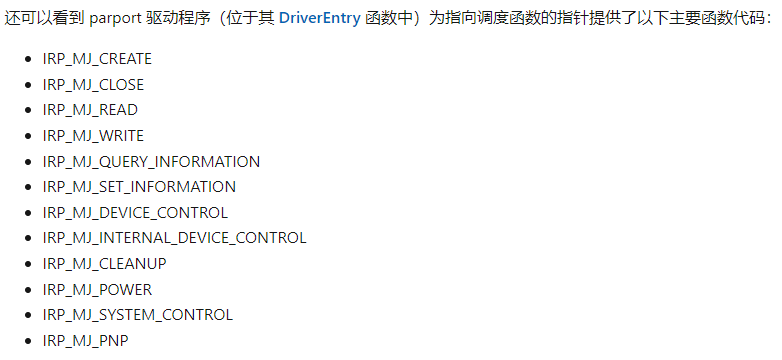
每个内核模式驱动程序都必须实现名为 DriverEntry 的函数,该函数在加载驱动程序之后会立即得到调用。 DriverEntry 函数使用指向驱动程序实现的一些其他函数的指针来填充 DRIVER_OBJECT 结构的某些成员。 例如,DriverEntry 函数使用指向驱动程序的 Unload 函数的指针来填充 DRIVER_OBJECT 结构的 Unload 成员
1
| DriverObject->MajorFunction[IRP_MJ_CREATE] = MyCreate;
|
根据上面的文档,创建的函数和主函数Entry差不多,这里用的是设备对象,不是驱动对象
1
2
3
4
5
6
7
8
9
| NTSTATUS
MyCreate(PDEVICE_OBJECT pdevice, PIRP pIrp) {
NTSTATUS RET = STATUS_SUCCESS;
DbgPrint("My Device Has Opened\n");
pIrp->IoStatus.Status = RET;
pIrp->IoStatus.Information = 0;
IoCompleteRequest(pIrp, IO_NO_INCREMENT);
return RET;
}
|
II. 关闭“句柄”
1
2
| DriverObject->MajorFunction[IRP_MJ_CLOSE] = MyClose;
DriverObject->MajorFunction[IRP_MJ_CLEANUP] = MyClean;
|
1
2
3
4
5
6
7
8
9
10
11
12
13
14
15
16
17
18
19
| NTSTATUS
MyClose(PDEVICE_OBJECT pdevice, PIRP pIrp) {
NTSTATUS RET = STATUS_SUCCESS;
DbgPrint("My Device Has Closed\n");
pIrp->IoStatus.Status = RET;
pIrp->IoStatus.Information = 0;
IoCompleteRequest(pIrp, IO_NO_INCREMENT);
return RET;
}
NTSTATUS
MyClean(PDEVICE_OBJECT pdevice, PIRP pIrp) {
NTSTATUS RET = STATUS_SUCCESS;
DbgPrint("My Device Has Clean\n");
pIrp->IoStatus.Status = RET;
pIrp->IoStatus.Information = 0;
IoCompleteRequest(pIrp, IO_NO_INCREMENT);
return RET;
}
|

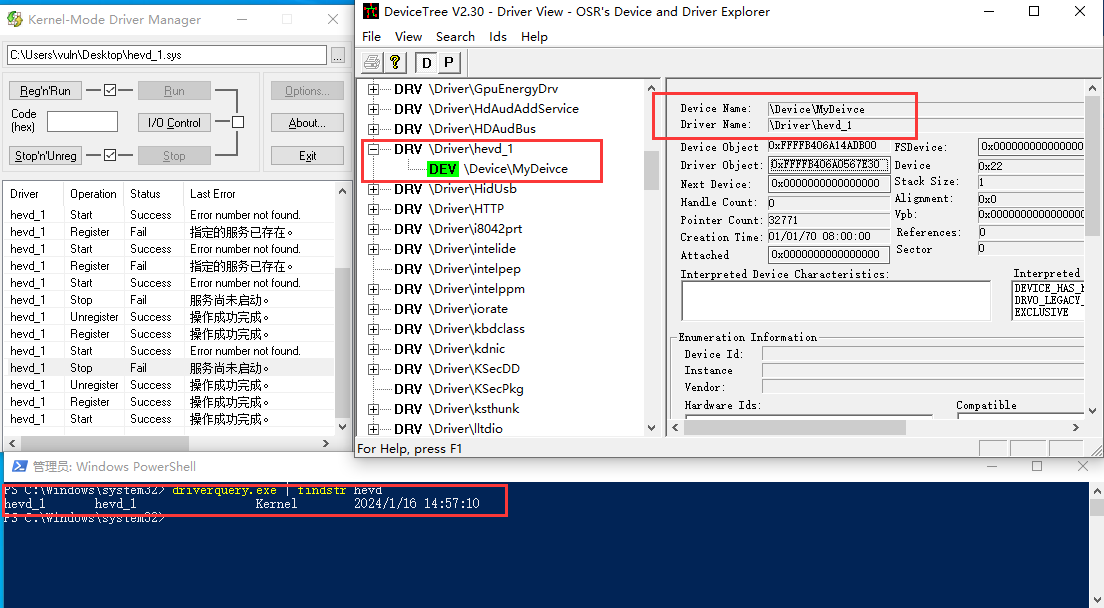
成功加载
III. 在Ring3进行交互
1
2
3
4
5
6
7
8
9
10
11
12
13
14
15
16
17
18
19
20
21
| #include <iostream>
#include <windows.h>
int main()
{
HANDLE hDevice = NULL;
hDevice = CreateFileW(L"\\\\.\\My1DeviceLinker", GENERIC_READ | GENERIC_WRITE, 0, NULL, OPEN_EXISTING, FILE_ATTRIBUTE_NORMAL, NULL);
if (hDevice== INVALID_HANDLE_VALUE) {
std::cout << "Error Create File\n";
system("pause");
return 0;
}
std::cout << "Success open\n";
system("pause");
CloseHandle(hDevice);
std::cout << "Success close\n";
system("pause");
return 0;
}
|
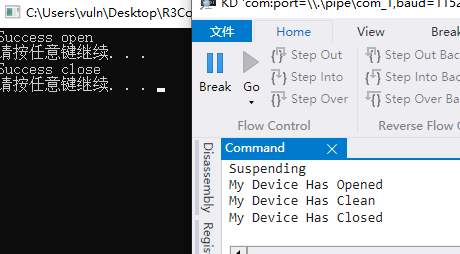
C. 二阶段
MSDN:https://learn.microsoft.com/zh-cn/windows-hardware/drivers/ddi/wdm/nf-wdm-iocreatedevice
关于创建设备的原型
1
2
3
4
5
6
7
8
9
| NTSTATUS IoCreateDevice(
[in] PDRIVER_OBJECT DriverObject,
[in] ULONG DeviceExtensionSize,
[in, optional] PUNICODE_STRING DeviceName,
[in] DEVICE_TYPE DeviceType,
[in] ULONG DeviceCharacteristics,
[in] BOOLEAN Exclusive,
[out] PDEVICE_OBJECT *DeviceObject
);
|
1
| [in] DeviceExtensionSize
|
指定要为 设备对象的设备扩展 分配的驱动程序确定的字节数。 设备扩展的内部结构是驱动程序定义的。
- 维护设备状态信息。
- 为驱动程序使用的任何内核定义对象或其他系统资源(如旋转锁)提供存储。
- 保存驱动程序必须在系统空间中驻留的任何数据,以执行其 I/O 操作。
那么这就是一段描述要传输的数据的空间的大小的值。
从驱动中读取
驱动MyRead函数和DriverEntry
1
2
3
4
5
6
7
8
9
10
11
12
13
14
15
16
17
18
| NTSTATUS
MyRead(PDEVICE_OBJECT pdevice, PIRP pIrp) {
UNREFERENCED_PARAMETER(pdevice);
NTSTATUS RET = STATUS_SUCCESS;
DbgPrint("My Device Has Read\n");
PIO_STACK_LOCATION pStack = IoGetCurrentIrpStackLocation(pIrp);
ULONG ReadSize = pStack->Parameters.Read.Length;
PCHAR Buffer = pIrp->AssociatedIrp.SystemBuffer;
DbgPrint("Ring3 Want Read %x\n", ReadSize);
RtlCopyMemory(Buffer, "Message From Driver", strlen("Message From Driver"));
pIrp->IoStatus.Status = RET;
pIrp->IoStatus.Information = strlen("Message From Driver");
IoCompleteRequest(pIrp, IO_NO_INCREMENT);
return RET;
}
|
R3
1
2
3
4
5
| CHAR Test[0x40] = { 0 };
DWORD lpRead = 0;
ReadFile(hDevice, Test, 30, &lpRead, NULL);
printf("%p -%s--%d\n", Test, Test,lpRead);
|
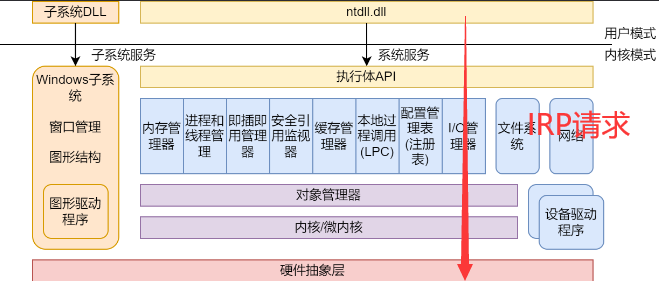
每向下传递一层需要一个设备栈(可以试着从自己设计这样一个模式的角度想想)
SystemBuffer和pIrp->MdlAddress是同一块物理地址的两个不同虚拟地址(不同的映射)。
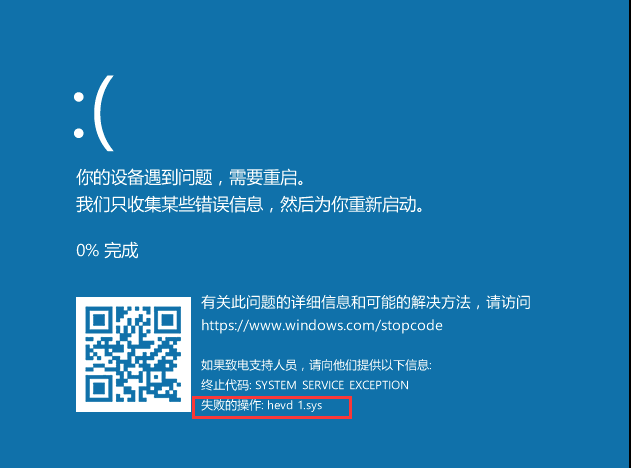
需要设置读写方式
1
2
| pDevice->Flags |= DO_BUFFERED_IO;
|

向驱动中写入
R3
1
| WriteFile(hDevice, "This is From Ring3.", strlen("This is From Ring3."), &lpRead, NULL);
|
驱动
1
2
3
4
5
6
7
8
9
10
11
12
13
14
15
16
17
18
19
20
| NTSTATUS
MyWrite(PDEVICE_OBJECT pdevice, PIRP pIrp) {
UNREFERENCED_PARAMETER(pdevice);
NTSTATUS RET = STATUS_SUCCESS;
DbgPrint("My Device Has Wrtitten\n");
PIO_STACK_LOCATION pStack = IoGetCurrentIrpStackLocation(pIrp);
ULONG ReadSize = pStack->Parameters.Write.Length;
PCHAR Buffer = pIrp->AssociatedIrp.SystemBuffer;
DbgPrint("Ring3 Write Read %x\n", ReadSize);
RtlZeroMemory(pdevice->DeviceExtension, 200);
RtlCopyMemory(pdevice->DeviceExtension, Buffer, ReadSize);
DbgPrint("--%p-%s\n", Buffer, (PCHAR)pdevice->DeviceExtension);
pIrp->IoStatus.Status = RET;
pIrp->IoStatus.Information = strlen("Message From Driver");
IoCompleteRequest(pIrp, IO_NO_INCREMENT);
return RET;
}
|

[IOCTL]自定义控制IO
IRP_MJ_DEVICE_CONTROL,定义IOCTL操作,很多内核的交互大多都是依靠此方式
这里程序接收一个数字返回值x2
驱动
定义操作标识
MSDN:https://learn.microsoft.com/zh-cn/windows-hardware/drivers/ddi/d4drvif/nf-d4drvif-ctl_code
1
2
| #define IOCTL_MUL CTL_CODE(FILE_DEVICE_UNKNOWN, 0x9888, METHOD_BUFFERED, FILE_ANY_ACCESS)
|
编写函数
1
2
3
4
5
6
7
8
9
10
11
12
13
14
15
16
17
18
19
20
21
22
23
24
25
26
27
28
29
30
31
32
33
34
35
| NTSTATUS
MyControl(PDEVICE_OBJECT pdevice, PIRP pIrp) {
UNREFERENCED_PARAMETER(pdevice);
NTSTATUS RET = STATUS_SUCCESS;
DbgPrint("My Device Has IOCTL\n");
PIO_STACK_LOCATION pStack = IoGetCurrentIrpStackLocation(pIrp);
ULONG ioCode = pStack->Parameters.DeviceIoControl.IoControlCode;
ULONG inLen = pStack->Parameters.DeviceIoControl.InputBufferLength;
ULONG ioInfo = 0;
switch (ioCode)
{
case IOCTL_MUL:
{
DWORDLONG inData = *(PDWORDLONG)pIrp->AssociatedIrp.SystemBuffer;
DbgPrint("Kernel Recive: %d, Len: %lld\n", inData, inLen);
inData *= 2;
DbgPrint("Kernel Data %d\n", inData);
*(PDWORDLONG)pIrp->AssociatedIrp.SystemBuffer = inData;
ioInfo = 4;
break;
}
default:
RET = STATUS_UNSUCCESSFUL;
ioInfo = 0;
break;
}
pIrp->IoStatus.Status = RET;
pIrp->IoStatus.Information = ioInfo;
IoCompleteRequest(pIrp, IO_NO_INCREMENT);
return RET;
}
|

一些关键函数
DriverEntry
1
2
3
4
5
6
7
8
9
10
11
12
13
14
15
16
17
18
19
20
21
22
23
24
25
26
27
28
29
30
31
32
33
34
35
36
37
38
39
40
41
42
43
| NTSTATUS
DriverEntry(PDRIVER_OBJECT DriverObject, PUNICODE_STRING RegistryPath)
{
UNREFERENCED_PARAMETER(RegistryPath);
NTSTATUS Status = STATUS_SUCCESS;
DbgPrint("Driver Running -> %wZ\n", &DriverObject->DriverName);
DriverObject->DriverUnload = DriverUnload;
UNICODE_STRING DeviceName = { 0 };
PDEVICE_OBJECT pDevice = NULL;
RtlInitUnicodeString(&DeviceName, DEVICE_NAME);
Status = IoCreateDevice(DriverObject, 0x200, &DeviceName, FILE_DEVICE_UNKNOWN, 0, TRUE, &pDevice);
if (!NT_SUCCESS(Status)) {
DbgPrint("Create Device Failed: %x\n", Status);
return Status;
}
pDevice->Flags |= DO_BUFFERED_IO;
UNICODE_STRING SymLink = { 0 };
RtlInitUnicodeString(&SymLink, SYM_NAME);
Status = IoCreateSymbolicLink(&SymLink, &DeviceName);
if (!NT_SUCCESS(Status)) {
    DbgPrint("Create Symbol Link Failed: %x\n", Status);
    IoDeleteDevice(pDevice);
    return Status;
}
DbgPrint("Device & Symbolic Link Created\n");
DriverObject->MajorFunction[IRP_MJ_CREATE] = MyCreate;
DriverObject->MajorFunction[IRP_MJ_CLOSE] = MyClose;
DriverObject->MajorFunction[IRP_MJ_CLEANUP] = MyClean;
DriverObject->MajorFunction[IRP_MJ_READ] = MyRead;
DriverObject->MajorFunction[IRP_MJ_WRITE] = MyWrite;
DriverObject->MajorFunction[IRP_MJ_DEVICE_CONTROL] = MyControl;
DbgPrint("Function Settal Done\n");
return Status;
}
|
DriverUnload
1
2
3
4
5
6
7
8
9
10
11
12
13
14
| VOID
DriverUnload(PDRIVER_OBJECT DriverObject)
{
UNREFERENCED_PARAMETER(DriverObject);
DbgPrint("Driver Stopping -> %wZ\n", &DriverObject->DriverName);
DbgPrint("Device Stopping\n");
if (DriverObject->DeviceObject) {
IoDeleteDevice(DriverObject->DeviceObject);
UNICODE_STRING symname = { 0 };
RtlInitUnicodeString(&symname, SYM_NAME);
IoDeleteSymbolicLink(&symname);
}
}
|
用于在Ring3交互的项目的主函数
1
2
3
4
5
6
7
8
9
10
11
12
13
14
15
16
17
18
19
20
21
22
23
24
25
26
27
28
29
|
#include <iostream>
#include <windows.h>
#define IOCTL_MUL CTL_CODE(FILE_DEVICE_UNKNOWN, 0x9888, METHOD_BUFFERED, FILE_ANY_ACCESS)
int main()
{
HANDLE hDevice = NULL;
hDevice = CreateFileW(L"\\\\.\\My1DeviceLinker", GENERIC_READ | GENERIC_WRITE, 0, NULL, OPEN_EXISTING, FILE_ATTRIBUTE_NORMAL, NULL);
if (hDevice== INVALID_HANDLE_VALUE) {
std::cout << "Error Create File\n";
return 0;
}
std::cout << "Success open\n";
system("pause");
std::cout << "now IOCTL\n";
DWORDLONG a = 64;
DWORDLONG b = 0;
DWORD info = 0;
DeviceIoControl(hDevice, IOCTL_MUL, &a, sizeof(DWORDLONG), &b, sizeof(DWORDLONG), &info, NULL);
printf("value a: %lld, b: %lld\nreal info %d\n", a, b, info);
CloseHandle(hDevice);
std::cout << "Success close\n";
return 0;
}
|
参考
https://www.bilibili.com/video/BV1QJ411A7kR
https://space.bilibili.com/1992190180/
https://learn.microsoft.com/zh-cn/windows-hardware/drivers/kernel/xianzh


